How To Know If Windshield Repair Worked Effectively
To know if your windshield repair was successful, check for a smooth, clear surface without any remaining cracks or distortions, and ensure no new chips or spreading cracks appear. A good repair will restore the windshield’s clarity and strength, so you shouldn’t notice any visual disturbances or wobbling when driving. To confirm, take a close look at the repaired area in good lighting and test drive gently to see if the damage remains stable.
If your windshield repair worked well, the crack or chip should be virtually invisible and structurally sound, giving you peace of mind on the road. It’s essential to assess both the appearance and the integrity of the repair to avoid future issues. Properly repaired windshields not only look better but also keep you safe by maintaining the windshield’s strength.
A windshield repair’s success can sometimes be subtle, but knowing what to look for helps you confirm if the repair has done its job. The key signs include a clear and smooth surface with no visible cracks, distortions, or signs of spreading damage. If you notice any of these issues, it’s worth consulting your technician. Regularly inspecting the repaired area and ensuring it feels stable when driving are simple ways to verify the repair’s effectiveness. Remember, a well-executed repair not only improves visibility but also reinforces your windshield’s safety, keeping you secure behind the wheel.

How to Know if Windshield Repair Worked
Understanding the Purpose of Windshield Repair
Windshield repair is meant to fix chips or cracks in your car’s glass quickly and effectively. The goal is to restore the windshield’s structural integrity and clarity. A properly completed repair should prevent the damage from spreading further.
Initial Visual Checks After Repair
Once the repair is done, start with a thorough visual inspection. Look closely at the repaired area to see if the crack or chip has disappeared or become less noticeable. A successful repair should leave the surface smooth and clear.
Check for Bubbles or Striations
Look for any bubbles or stray lines in the resin used for the repair. These imperfections could indicate a poor-quality fix. Good repairs will generally be seamless and free of visible flaws.
Inspect the Clarity of the Windshield
A clear view through the repaired area signals success. If you see cloudiness, distortion, or a cloudy patch, the repair might not have fully cured or could have been improperly done.
Performing a View Test
One of the best ways to assess your windshield after repair is to perform a simple viewing test. Sit in your car and look through the repaired area from different angles.
Check for Distortion or Blur
Tilt your head slightly and observe if the glass appears distorted. Good repairs shouldn’t cause any visual distortion, ensuring safe driving and clear visibility.
Use a Flashlight for Better Details
Hold a flashlight close to the repair site and examine the area. If light passes smoothly without reflections or cloudiness, the repair likely did its job well.
Feel for Uneven Surfaces
Gently run your finger over the repair area. The surface should be smooth and flush with the rest of the windshield. Any roughness or bumpiness might indicate incomplete curing or poor adhesion.
Assessing Structural Integrity
While visual checks are helpful, assessing the windshield’s strength requires more insight. The repair should restore enough of the original strength of the glass to withstand minor impacts.
Test the Repair Under Gentle Pressure
Carefully press around the repaired area with your finger or nail. If it feels firm and stable, it indicates good adhesion. Avoid applying excessive force to prevent causing further damage.
Watch for Internal Cracks or Spreading Damage
Monitor the repaired area over time. If new cracks form or existing ones spread, the repair might not be durable enough. A good fix should hold steady and prevent additional damage.
Driving Experience and Comfort
Your actual driving experience can reveal a lot. Notice how the windshield performs under different conditions.
Check for Vibrations or Shaking
If you feel vibrations or shakiness near the repair site, it could point to an inadequate fix. A stable repair causes no additional vibrations when driving.
Observe for Sudden Cracks or Chips
Pay attention to your windshield during daily driving. If the crack or chip reappears or spreads, the repair may not have worked effectively.
When to Seek a Professional Evaluation
Even if initial signs look promising, some issues only become clear over time or under specific conditions.
Schedule a Follow-Up Inspection
Visit your repair specialist if you notice any irregularities. Professionals can assess the repair’s quality more thoroughly with specialized tools.
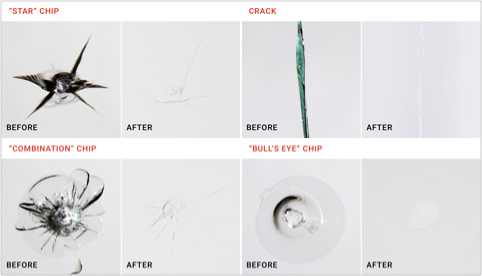
Compare Before and After Photos
Some technicians take photos of the damage before and after repair. Comparing these images can help you determine if the repair improved the damage adequately.
Signs of a Failed Windshield Repair
Not all repairs are successful. Watch out for these warning signs indicating your repair might have failed.
- Persistent Visibility Issues: Cloudiness or distortion remains after repair.
- Damage Reappearance: Cracks or chips reappear or worsen.
- Unusual Noises or Vibrations: Vibrations when driving or unusual sounds near the repaired area.
- Cracks Spreading Over Time: Damage extending outward from the repair site.
Maintaining the Repair for Long-Term Success
Proper care after repair helps ensure it lasts. Avoid washing the car with high-pressure water near the repair site for at least 24 hours.
Limit Sudden Temperature Changes
Extreme cold or heat can affect the resin. Keep the windshield at a stable temperature until fully cured, usually within 24 hours.
Be Gentle with Your Windshield
Avoid slamming doors or using harsh cleaning agents on the repair area. Gentle cleaning preserves the integrity of the fix.

Similar Posts