Windshield Chip Repair Kits: How to Compare by Type
DIY windshield chip repair kits can stop a small chip from spreading if you act fast, and the real differences between kits come down to three things: resin quality, the injector or bridge design, and the cure method. They are only for small chips, not for long cracks, edge cracks, or full replacement. A kit is damage control: it can keep a chip from turning into a crack and make the mark less visible, but it will not make the glass look untouched. Anything in the driver's line of sight, near the edge, or longer than a few inches belongs with a professional.
Most "best kit" articles hand you a ranked list and a checkout button. This guide does the opposite. Instead of naming a winner, it shows you the criteria that separate one kit from another, so you can match a kit to your specific chip and skip the ones that will not help. We do not sell these kits, and the comparisons below are based on published product specifications and manufacturer information, not our own lab testing.
Quick comparison: the three kit types
Almost every consumer chip repair kit falls into one of three designs. They all inject a clear resin into the damage, but they differ in how much pressure they can apply, which controls how well the resin fills a deeper break.
| Kit type | How it applies resin | Best suited for | Main limitation |
|---|---|---|---|
| Peel-and-stick / adhesive-disc | An adhesive disc or tape holds a resin reservoir over the chip with no active pressure | The smallest, shallow bull's-eye chips and true first-timers | Weakest penetration; struggles with deep or star-shaped breaks |
| Syringe kit | A hand syringe pushes resin in and can draw a light vacuum first | Small to medium chips; the most common drugstore option | Results depend heavily on your technique |
| Bridge / injector kit | A bridge frame holds an injector that cycles vacuum, then pressure | Deeper chips, star breaks, and the clearest optical result | More steps and a steeper learning curve |
If you remember one thing: the more control a kit gives you over vacuum and pressure, the better it fills a stubborn chip, at the cost of being fiddlier to use.
What actually differs between chip repair kits
The packaging and brand name tell you almost nothing. Here is what genuinely changes the result.
Resin type and viscosity
The resin is the heart of the kit. It is a single-part acrylic that stays liquid until light hardens it. What matters is its viscosity, measured in centipoise (cps). Thinner, low-viscosity resin flows into tight, hairline legs of a star break more easily. Thicker, high-viscosity resin fills the open pit of a larger bull's-eye chip and holds better under stress. Some kits ship one general-purpose resin; others (usually the injector-style kits aimed at serious DIYers) let you pick a viscosity for the damage. A cheaper kit is not automatically a worse repair, but a kit with old or low-grade resin can cloud or shrink as it cures, which is the most common reason a home fix looks worse than expected.
Injector or bridge design versus a plain syringe
This is the single biggest hardware difference. A bridge injector uses a two-stage cycle: it first pulls air out of the chip cavity, then pushes resin in under pressure. Removing the trapped air before the resin goes in is what produces cleaner penetration and better optical clarity. A syringe-only or peel-and-stick system is simpler and cheaper, but with less pressure control it tends to leave micro-bubbles or under-fill a deep chip. For a shallow, fresh chip the difference is small. For a deeper star break, the injector design is doing real work.
Cure method: sunlight, daylight, or a UV lamp
The resin only hardens under ultraviolet light. Most kits rely on the sun. In direct sunlight, resin typically cures in roughly 25 minutes; on a cloudy day it takes noticeably longer, and in full shade it may never fully harden. That is why cure method matters for when and where you can work. A few kits are formulated to cure in ordinary daylight rather than requiring direct sun, and dedicated repair kits with a small UV lamp cure fastest and most predictably, which helps if you are working in a garage or on an overcast day. If you have no reliable sunlight and no lamp, the repair can stay soft and fail.
Single-use versus multi-repair
Some kits carry just enough resin and one applicator for a single chip. Others include a reusable injector and enough resin for several repairs. If you only have one chip, a single-use kit is fine. If you drive gravel roads or own more than one car, a multi-repair kit is usually the better value over time, and the injector tends to be sturdier.
Ease of use
Be honest about your patience. Peel-and-stick and pre-loaded syringe kits forgive a shaky first attempt. Bridge injector kits reward care and punish rushing. There is no "easy" button that also delivers the clearest result, so pick the trade-off that fits how much time you will actually spend.
What a chip repair kit can and cannot fix
This is where matching the tool to the damage decides everything. A kit works only inside a narrow window.
A repair kit is a reasonable option when the damage is:
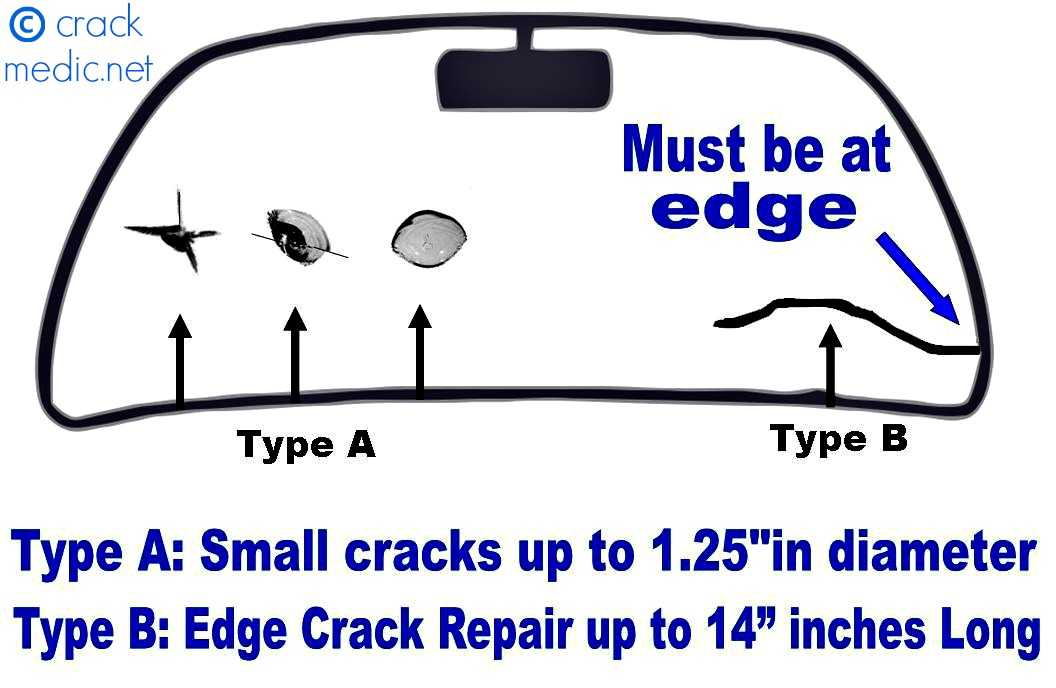
- Roughly the size of a quarter (about an inch) or smaller, per the industry Repair of Laminated Automotive Glass Standard (ROLAGS)
- A single chip: a bull's-eye, a star break, or a small combination chip
- Outside the driver's direct line of sight
- Not touching or near the edge of the glass
- Fresh, clean, and dry, before dirt or water gets into it
A kit is the wrong tool, and you should call a professional, when the damage is:
- A long crack (most kits are rated only for small chips, and even shops draw the line well before a crack runs the full glass)
- An edge crack, or any crack starting within about two inches of the edge, where the glass is under the most stress and a resin repair is far more likely to fail or keep spreading
- Anywhere in the driver's critical viewing area, the zone swept by the wipers in front of the steering wheel, where even a good repair can leave enough distortion to be unsafe and often calls for replacement
- Deep enough to have penetrated both layers of the laminated glass
- Contaminated with water, road grime, or a previous failed repair attempt
The honest part: a kit is damage control, not a flawless fix
Here is what the ranked "best kit" lists tend to skip. Even a perfect DIY repair does not make the chip disappear. A good result stabilizes the damage so it stops spreading and makes the mark meaningfully less noticeable, but you will usually still see a faint blemish if you look for it. Kits that promise an invisible repair are overselling. The realistic goal is to buy time and prevent a small chip from turning into a crack that forces a full replacement.
Knowing when to stop matters as much as knowing how to start. If a chip is in your sightline, near an edge, already spidering into a crack, or bigger than the kit is rated for, a home repair can lock in a bad result or crack the glass further while you work. At that point the money is better spent on a professional repair or a replacement.
Replacement is where the stakes rise on a modern car. If your vehicle has driver-assistance features like automatic emergency braking, lane-keeping, or adaptive cruise control, the forward-facing camera usually lives behind the windshield. Replace that glass and the camera almost always needs to be recalibrated so those systems aim correctly. That is a real, separate line item, and it is exactly the cost a DIY kit is trying to help you avoid. If you have reached the point of replacement, it is worth understanding the full cost of ADAS calibration after a windshield replacement, how a quote changes for a windshield replacement with versus without ADAS, and whether your car needs static or dynamic calibration, because those factors, not the glass alone, drive the final number.
How to choose the right kit for your chip
Work in this order:
- Check the damage against the limits above first. If it fails any of them, no kit is the right buy. Save the money toward a professional repair or replacement.
- Match the design to the break. A shallow, fresh chip is fine for a syringe or adhesive-disc kit. A deeper or star-shaped break benefits from a bridge injector.
- Match the cure method to your conditions. Reliable direct sun means a standard kit is enough. Garage or cloudy climate means favor a daylight-cure formula or a kit with a UV lamp.
- Decide single-use versus multi-repair by how many chips you expect. One car, one chip: single-use. Gravel commute or multiple vehicles: buy the reusable injector.
- Act quickly. A clean, fresh chip repairs far better than one that has collected water and dirt for a week. Cover it with clear tape until you can work on it.
Frequently asked questions
Do more expensive kits actually work better?
Not automatically. Price often reflects a reusable injector, better resin viscosity options, or an included UV lamp, all of which help on harder chips. But a careful repair with a modest syringe kit on a small, fresh chip can beat a rushed job with an expensive one. The damage type and your technique matter more than the sticker.
Can I mix resin from one kit with the injector from another?
It is not recommended. Injector fit, resin viscosity, and cure chemistry are designed to work together within a single kit. Mixing components makes results unpredictable, and a poorly cured repair can be worse than no repair because it can trap contamination in the chip.
How long does an unopened repair kit last on the shelf?
Windshield resin is light-sensitive and does degrade over time, so kits carry a shelf life and should be stored in a cool, dark place. Check the manufacturer's date before buying an old-stock kit, because resin that has started to break down can cloud or fail to harden. When in doubt, buy fresh rather than use a kit that has been sitting in a hot glove box for years.
Will a repair pass a state inspection or stop a ticket?
It depends on the location and the damage. A stabilized chip outside the driver's viewing area is generally fine, but damage in the driver's line of sight can still be flagged even after a repair. If the chip is in that critical zone, plan on replacement rather than a kit.
Can a kit fix a crack, not just a chip?
Consumer kits are built for small chips. Some are rated for very short cracks, but long cracks, edge cracks, and anything spreading are beyond what a home kit can reliably hold. Those need a professional, and often a full replacement.

Similar Posts