Steps To Replace A Cracked Windshield For Safety And Clarity

If your windshield is cracked, don’t wait for the damage to worsen or risk safety on the road. Replacing a cracked windshield might seem daunting, but with the right steps, it can be manageable even for DIY enthusiasts. The key is to carefully remove the damaged glass, clean the area, and properly install a new windshield using the appropriate adhesives and tools.
In short, replacing a cracked windshield involves removing the broken glass carefully, preparing the frame, applying adhesive, and fitting the new windshield securely. Taking your time and following these steps precisely can save you money and keep your vehicle safe.
When dealing with a cracked windshield, acting quickly is essential to prevent further damage or compromising your safety. The process begins with assessing the damage to determine if replacement is necessary, which is often the case if cracks are extensive or in your line of sight. Carefully removing the old windshield involves cutting through the adhesive and removing any remaining glass fragments. Before installing the new windshield, thoroughly clean and prepare the frame to ensure a perfect fit. Applying the right adhesive and pressure ensures a secure bond, preventing leaks or future damage. While some choose professional installation, many confident DIYers can replace a windshield with patience and proper tools, saving money and restoring safety to their vehicle.

Steps to replace a cracked windshield
Gather the Necessary Tools and Materials
Before starting the windshield replacement process, collect all essential tools. You will need items such as a windshield removal tool, a razor blade, a suction cup, and a suitable adhesive or sealant. Having everything ready saves time and prevents interruptions during the job.
Get the right replacement windshield that fits your vehicle’s make and model. Check with your car’s manual or consult a professional to ensure correct sizing. Using an incompatible windshield can result in poor fitment and safety issues.
Ensure you have safety gear on hand. Wear gloves to protect your hands from glass shards and safety glasses to shield your eyes. Safety should always come first when handling broken or replacement glass.
Prepare Your Workspace
Choose a clean, well-lit area with enough space to work comfortably. Make sure the surface is flat to prevent the windshield from falling or shifting. Cover nearby surfaces with plastic or cloth to protect against dust and adhesive spills.
Remove all vehicle accessories around the windshield area. Items like windshield wipers and trims can interfere with the removal and installation processes. Keep these parts organized for easy reinstallation later.
Maintain proper ventilation in your workspace. Adhesive fumes can be harmful if inhaled excessively. Opening windows or working outdoors helps disperse these fumes and keeps the air fresh.
Remove the Broken Windshield Carefully
Start by disconnecting your vehicle’s windshield wipers. Use a wrench or screwdriver to detach the wiper arms from their pivots. This step provides clear access to the edges of the windshield.
Use a heat gun or hairdryer to warm the edges of the glass. Gentle heat softens the adhesive, making it easier to detach the windshield without cracking the glass further. Do this carefully to avoid damage.
Insert the windshield removal tool or crowbar between the glass and the vehicle frame. Carefully work around the edges, applying even pressure to loosen the adhesive. Avoid sudden movements that might cause the glass to shatter unexpectedly.
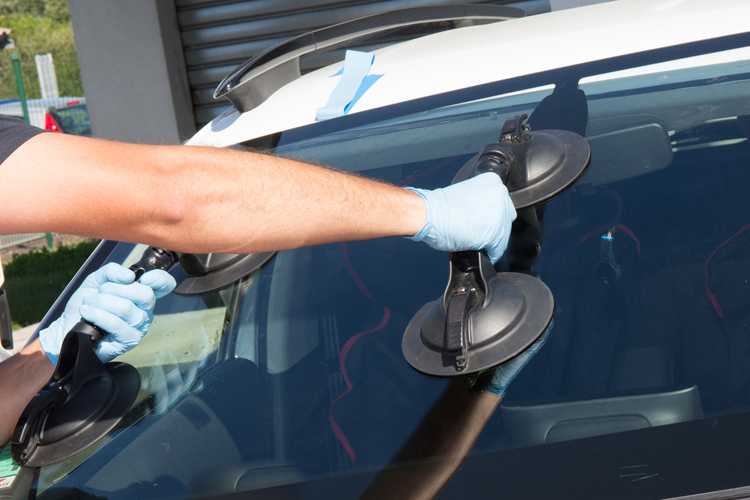
Use a suction cup to lift the broken windshield from the frame. Be cautious, and have an assistant hold the glass steady during removal. Dispose of the shattered glass safely, preferably in a thick trash bag or designated disposal area.
Clean and Prepare the Frame
Once the broken glass is removed, clean the frame thoroughly. Remove old adhesive residue with a razor blade or adhesive remover. This step ensures a smooth surface for the new adhesive.
Inspect the frame for any damage or rust. Minor repairs can prevent future issues and ensure a secure fit. Sand down rusted areas and apply a rust-inhibiting primer if needed.
Apply a primer or a special cleaning solution recommended by the adhesive manufacturer. This enhances the bonding process between the frame and the new windshield. Allow it to dry completely before proceeding.
Apply New Adhesive and Install the Replacement Windshield
Lay out the new windshield and check for any damages or defects. Confirm that it’s the correct size before installation. Remove any protective films or coverings from the adhesive surface.
Apply a high-quality automotive adhesive or urethane sealant evenly around the perimeter of the frame. Follow the manufacturer’s instructions carefully. Use a caulking gun for precision and consistency.
With the help of an assistant, carefully place the new windshield onto the frame. Align it precisely with the edges of the frame to ensure proper fitment. Gently press down to secure the glass and remove any air bubbles trapped underneath.
Use a rubber squeegee or roller to press firmly along the edges, ensuring a strong seal. Smooth out any excess adhesive that oozes out for a clean appearance. Allow the adhesive to cure as per the manufacturer’s recommendations.
Reinstall Wipers and Accessories
Once the adhesive has set, reinstall the windshield wipers. Attach the arms to their pivots securely and test their movement to ensure proper operation. Replace any trim or molding pieces removed earlier.
Check for any gaps or signs of improper sealing. If everything looks good, clean the surface of the windshield with a glass cleaner. Remove fingerprints, smudges, and dust.
Allow the adhesive to cure fully before driving your vehicle. This usually takes at least 24 hours, but always follow the specific curing time provided by the adhesive manufacturer for best results.
Final Inspection and Testing
After curing, do a thorough inspection of the installation. Look for leaks, gaps, or loose edges. Ensure that the windshield is securely attached and aligned correctly.

Similar Posts