How to Temporarily Tint Car Windows: Removable Film and Law
Senior Automotive Glass Diagnostic Specialist & Master Technician at CarGlassFix · AGSC Master Certified Auto Glass Technician, NGA Certified Installer, I-CAR Automotive Safety Specialist · 12+ Years in Automotive Glazing, Windshield Structural Bonding, ADAS Camera Calibration & Precision Chip Restoration
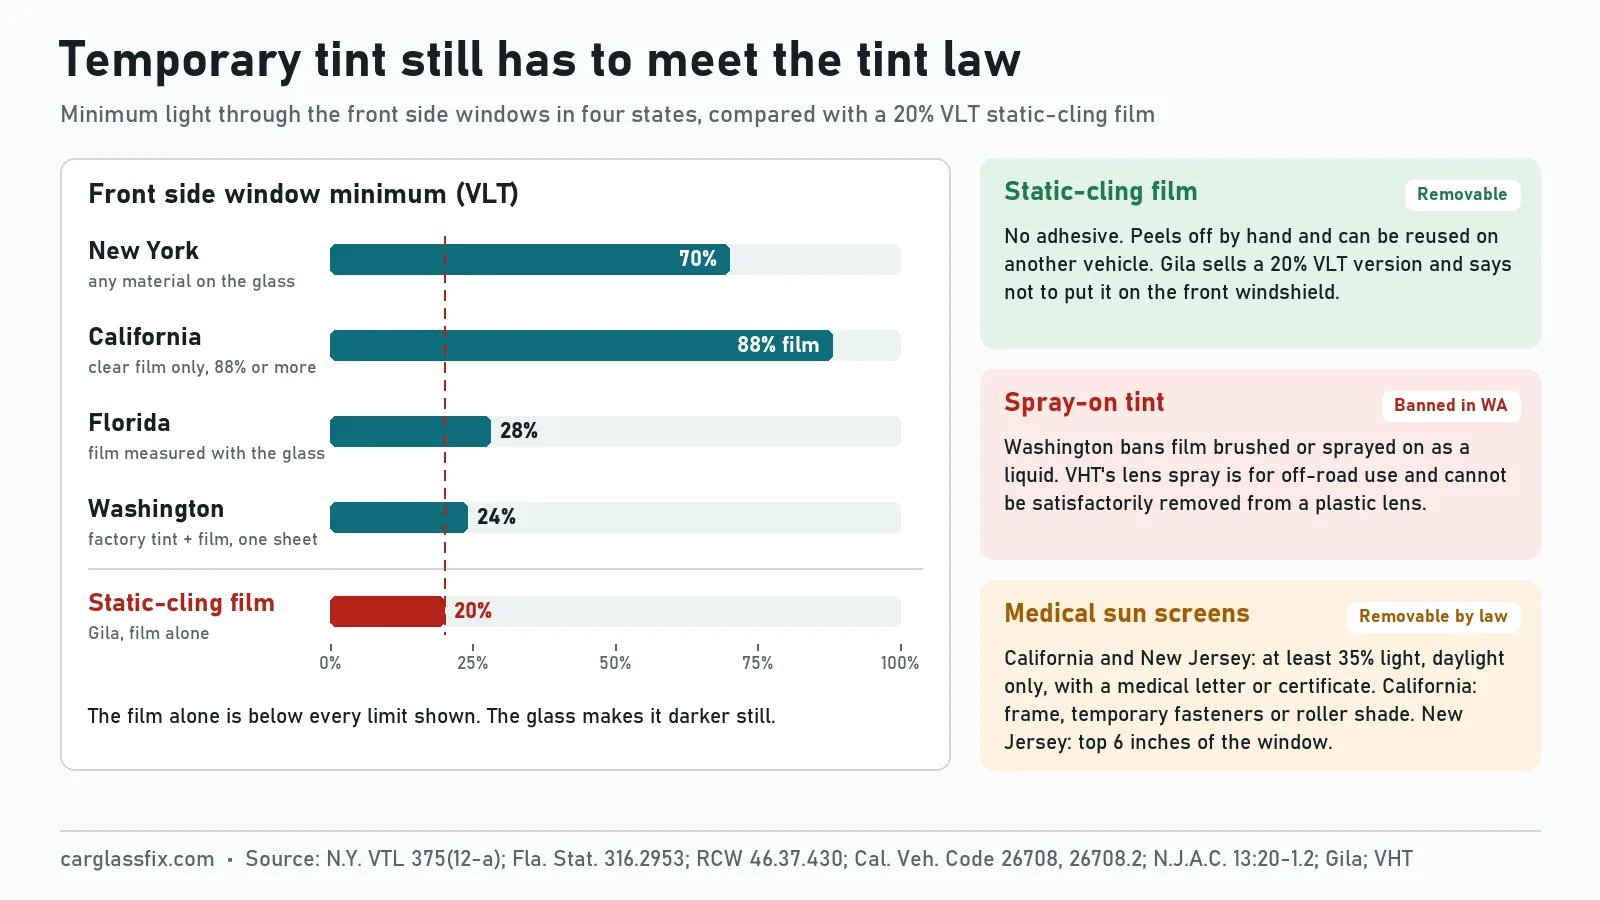
To temporarily tint car windows, use static-cling film. This adhesive-free vinyl goes on the inside of the glass with application solution and a squeegee, and it peels off by hand. Gila sells a 20% VLT version. The film must still meet your state’s tint limit while you drive, and it stays off the windshield.
Static-cling and other removable films
Static-cling film is tint film made to be removed. The film holds to the glass without glue, so it comes off without scraping or solvent. Gila, a window film brand of Eastman Performance Films, sells a static-cling automotive tint at 20% visible light transmission (VLT). That film lets 20% of visible light through and blocks 80%. Gila describes it as adhesive-free film “for temporary installation needs and for a film that is easier to remove.”
Gila sells its automotive films in a 24-inch width, which it says covers most car windows. The film goes on the inside surface of the glass. Gila’s product page lists light blocking and glare reduction. It lists no UV or heat rejection figure for the static-cling film.
| Option | How it holds | How it comes off | Reusable |
|---|---|---|---|
| Static-cling film | Static cling after a wet install, no adhesive | Peel it off by hand | Yes. Gila says it can be re-applied and reused on another vehicle |
| Adhesive tint film | Adhesive layer bonded to the glass | Soak, scrape and remove the leftover adhesive | No. Gila says its adhesive films cannot be re-installed |
| Spray-on tint coating | A liquid that dries on the surface | Depends on the product. VHT says its lens tint cannot be satisfactorily removed from plastic | No |
| Removable sun-screen device | A frame, temporary fasteners or a roller shade | Lift or roll it off | Yes. California’s medical rule is written for this type |
Permanent adhesive film is a different job with its own steps. Our guide on how to install car window tint covers it.
How to put on static-cling tint
Static-cling film goes on wet, like adhesive film, and it is trimmed on the outside of the glass before it is moved inside. These steps follow Gila’s instructions for a roll-down side window. Gila recommends starting with the smallest flat window and working with a second person. Check your state’s limit for that window before you cut any film.
How to install static-cling tint on a roll-down side window
Pick a legal shade
Compare the film’s VLT with your state’s minimum for that window. States such as Florida and Washington measure the film and the glass together, so the reading is darker than the label.
Choose the conditions
Work in a shaded, dust-free place. Gila says to apply film below 100°F, when it will stay above 40°F for at least three days.
Clean the glass
Spray application solution and scrape away dirt with a single-edged razor blade. Skip household glass cleaner, vinegar and ammonia right before the film goes on.
Rough-cut on the outside
Wet the outside glass and roll the film on with the paper liner facing out. Peel the liner, spray and trim the sides with light knife pressure. Leave the bottom edge about 1/4 to 1/2 inch below the top of the inside gasket.
Trim the top edge
Lower the window about 2 inches and trim along the top edge of the glass.
Move the film inside
Spray the inside glass and the film, and place the wet side on the glass with a gap of about 1/8 to 1/4 inch at the top. Squeegee the top, roll the window up and tuck the bottom under the gasket.
Squeegee out the water
Push the water and bubbles to the nearest edge, then dry the edges with a low-lint cloth wrapped around the squeegee.
Let it cure
Gila says the film cures over about a week to 10 days. Keep the window up, and wait at least 3 days before cleaning it.
Static-cling film can be corrected after the install. Gila says you can peel back an area, re-spray it and re-apply it at any time to clear a bubble or a speck of dust. Gila also warns that dark tint may reduce visibility in poor light.
Spray-on removable tint
Spray-on tint is a poor fit for temporary tint on car windows. The tint sprays sold for cars include lens coatings. VHT describes its Nite-Shades spray as a transparent coating for tail lights, fog lights and turn indicators. VHT warns that once it is applied to a plastic lens, it cannot be satisfactorily removed. VHT also labels the product for off-road use only. The product page lists no VLT figure, so there is no number to check against a tint law.
At least one state bans sprayed film on car windows outright. Washington’s tint law, RCW 46.37.430, prohibits film that is in liquid form before application and is brushed or sprayed on. Other states measure the result. New York’s rule covers windows “covered by or treated with any material” below its light limit. A sprayed coat on the glass is measured like any other material.
Shades, mesh screens and other no-film methods are covered in how to tint car windows without film.
Legal limits still apply to temporary tint
Tint laws apply to whatever is on the glass while you drive, so removable film is measured the same way as permanent film. California’s Vehicle Code section 26708 bars driving with any object or material “placed, displayed, installed, affixed, or applied” on the windshield or side or rear windows. Florida defines sunscreening material as a product or material that includes film and glazing. Florida also measures light transmittance through the material and the glass together. Washington counts the factory tint and any added film as one “net film screening” value.
| State | Wording that covers removable film | Front side window minimum | Source |
|---|---|---|---|
| New York | Windows covered by or treated with any material | 70% light transmittance | VTL 375(12-a) |
| Florida | Sunscreening material includes film; measured with the glass | 28% light transmittance, 25% maximum reflectance | Fla. Stat. 316.2951 and 316.2953 |
| Washington | Net film includes factory tint; one sheet per window | 24% light transmission, with outside mirrors on both sides | RCW 46.37.430 |
| California | Any material placed, affixed or applied | Only clear, colorless film of 88% VLT or more, without a medical exemption | Vehicle Code 26708 |
Federal law adds a rule for businesses. FMVSS 205, the federal glazing standard, includes a minimum light transmittance of 70%, as California’s code notes. Under 49 U.S.C. 30122, a manufacturer, distributor, dealer, rental company or repair business may not knowingly make inoperative a part installed to meet a federal safety standard. The statute does not name individual owners. State law sets what you may drive with. These states are examples only. Check your own state’s vehicle code or state police page, and see what window tint is legal for each state’s limits.
Medical exemptions that allow removable sun screens
California and New Jersey write removable sun screens into their medical exemption rules, with a 35% floor and daytime use only. California allows sun screening devices on the front side windows when the driver or a front passenger carries a signed letter. The letter comes from a licensed physician and surgeon for a medical condition, or from a licensed optometrist for a visual condition. The devices may not be used during darkness. California Vehicle Code 26708.2 sets the device rules:
- Held in place for ready removal, such as a frame, rigid material with temporary fasteners, or a roller shade.
- Transparent material in green, gray or neutral smoke, with at least 35% luminous transmittance.
- Louvered designs at least 35% open, with no opaque section taller than 3/16 inch.
- Reflectance of 35% or less on either surface.
New Jersey lets medical certificate holders put readily removable sun screens on the top 6 inches of the front side windows from sunrise to sunset. The window must still pass at least 35% of visible light. The certificate lasts 48 months, and the driver must show it to police on request.
Keep temporary film off the windshield
Static-cling film does not belong on the windshield, and Gila’s static-cling instructions say not to apply it there. In the states below, darker film is allowed only in a band at the top of the windshield. New Jersey’s rules define the AS-1 line as the mark on the glass edge that shows the area needed for driving visibility. The glass in that area has a luminous transmittance of at least 70%. Gila’s own windshield glare strip must not extend below the AS1 mark stamped on the glass. States set the band differently:
- New York: material under 70% only in the uppermost 6 inches.
- Washington: transparent film along the top edge, out of the AS-1 area and no more than 6 inches down.
- California: transparent material at the top if its bottom edge is at least 29 inches above the undepressed driver’s seat, and not red or amber.
For the full windshield rules, read is it illegal to tint your windshield.
How to remove temporary tint cleanly
Static-cling film comes off by peeling it away from the glass by hand, and it leaves no adhesive behind. No adhesive also means no residue to clean off a leased or borrowed car. Clean the glass afterward with application solution and a low-lint cloth. On the rear window, Gila says not to use a razor or any sharp tool on the inside of glass with printed defroster or antenna lines.
Some films sold as removable use an adhesive. Gila’s removal steps for adhesive film take longer:
- Spray remover on the film, cover it with plastic and test a corner every 30 minutes until it peels.
- Pry up 1 to 2 inches of a top corner with a razor and pull the film down.
- Soak the leftover adhesive for 3 to 5 minutes until it turns milky white, then shave it off with the glass kept wet.
- Over defroster lines, rub with paper towels or a non-scratching nylon pad instead.
Gila says its remover works best when the inside glass is 65 to 75°F. Wait at least 24 hours before new film goes on. For heat guns, steamers and other methods, see how to remove car window tint.
When shades or permanent tint fit better
California and Washington both treat the windows behind the driver more loosely than the front side windows. California’s rule on objects and material does not apply to side windows to the rear of the driver. Washington allows sun-screening devices on windows behind the driver if they cut the driver’s view uniformly by no more than 50%. A device on Washington’s rear window also needs outside mirrors on both sides.
Temporary film is a short-term fix. If you want lasting privacy, compare the options in best car window tint for privacy. For privacy in a parked car only, see how to fog up car windows for privacy.
Frequently asked questions
Is removable window tint legal?
Removable tint is legal only where its darkness meets your state’s limit for that window. Gila tells buyers to check with their state police before installing any film.
How long does static-cling tint last?
Gila does not publish a service life for its static-cling film. Gila warrants its window films against manufacturing defects for two years from purchase. Static-cling film can be peeled back and re-applied if a bubble or dust spot appears.
Can you put static-cling tint over existing tint?
A second layer makes the window darker, and Florida and Washington measure the film and the glass together. Washington bans more than one sheet of film on any window. Read can you layer car window tint before you stack films.
Does temporary tint block UV rays?
Gila’s static-cling product page lists no UV figure. Check the package for a UV rating, and see does car window tint block UV rays for how film and glass handle UV.
Can static-cling film go on plastic windows?
Gila says its static-cling film can be applied to plastic with careful trimming. Gila says its adhesive films must not go on plastic.
Sources
- Gila: Static Cling 20% VLT Window Tint, model 50146232 (checked 23 October 2026)
- Gila: How to install automotive static cling window tint, side roll-down windows (09/23)
- Gila: Automotive frequently asked questions
- Gila: Window film removal instructions (11/2024)
- Gila: Windshield glare strip instructions
- VHT: Nite-Shades lens coating
- California Vehicle Code 26708 and 26708.2 (text current as of 1 January 2026, checked 23 October 2026)
- New York Vehicle and Traffic Law 375, subdivision 12-a (checked 23 October 2026)
- Florida Statutes 316.2951 and 316.2953 (2025 statutes, checked 23 October 2026)
- Washington RCW 46.37.430, sunscreening or coloring (checked 23 October 2026)
- N.J.A.C. 13:20-1.2, 13:20-1.1, 13:20-1.6 and 13:20-1.7, New Jersey medical exemption rules (checked 23 October 2026)
- 49 CFR 571.205, FMVSS 205 glazing materials and 49 U.S.C. 30122, making safety devices inoperative (checked 23 October 2026)
- International Window Film Association: interactive tint laws

Similar Posts