Rear Defroster Tab Repair: Adhesives, Cure Times, Testing
Senior Automotive Glass Diagnostic Specialist & Master Technician at CarGlassFix · AGSC Master Certified Auto Glass Technician, NGA Certified Installer, I-CAR Automotive Safety Specialist · 12+ Years in Automotive Glazing, Windshield Structural Bonding, ADAS Camera Calibration & Precision Chip Restoration
A rear defroster tab is repaired by bonding the metal terminal back onto the window’s bus bar with a two-part electrically conductive adhesive. Sand both contact surfaces lightly, clean them, apply the adhesive and hold the tab still. Wait the full cure, 24 hours in GM’s dealer bulletin, before reconnecting the wire. Soldering heat can crack the glass.
How to tell a loose tab is the fault
A tab that has come off, or lost its electrical bond, cuts power to every grid line, so the whole rear defroster stops at once. A defroster that clears only part of the window has a broken grid line instead, according to Frost Fighter, a repair kit maker. Grid lines are a separate repair made with conductive grid paint.
The tabs are two metal terminals on the wide vertical bus bars at each side of the glass. A wire hanging near the edge of the window is the clearest sign. How the grid heats is covered in what a rear windshield defroster is.
A voltmeter confirms the fault. With the engine running and the defroster on, the two bus bars should read 12 to 14 volts. A reading of 0 volts on the bus bars, with 12.5 volts or more on the metal tabs, means a tab joint has failed. No voltage at the tabs points to the fuse, relay or wiring, covered in our guide to a rear window defroster not working. FCA treats the push-on connector on the 2018 to 2025 Jeep Wrangler (JL) as a one-time-use part, so a loose one gets replaced.
Conductive adhesive or solder: the repair materials
GM’s dealer procedure and the kit makers use a two-part, electrically conductive adhesive, which bonds the tab without a soldering iron’s spot heat. Frost Fighter and MG Chemicals make silver-filled epoxies. Permatex makes a conductive acrylic that cures with an activator.
| Product | Type | Handling | Heat | Before power-on |
|---|---|---|---|---|
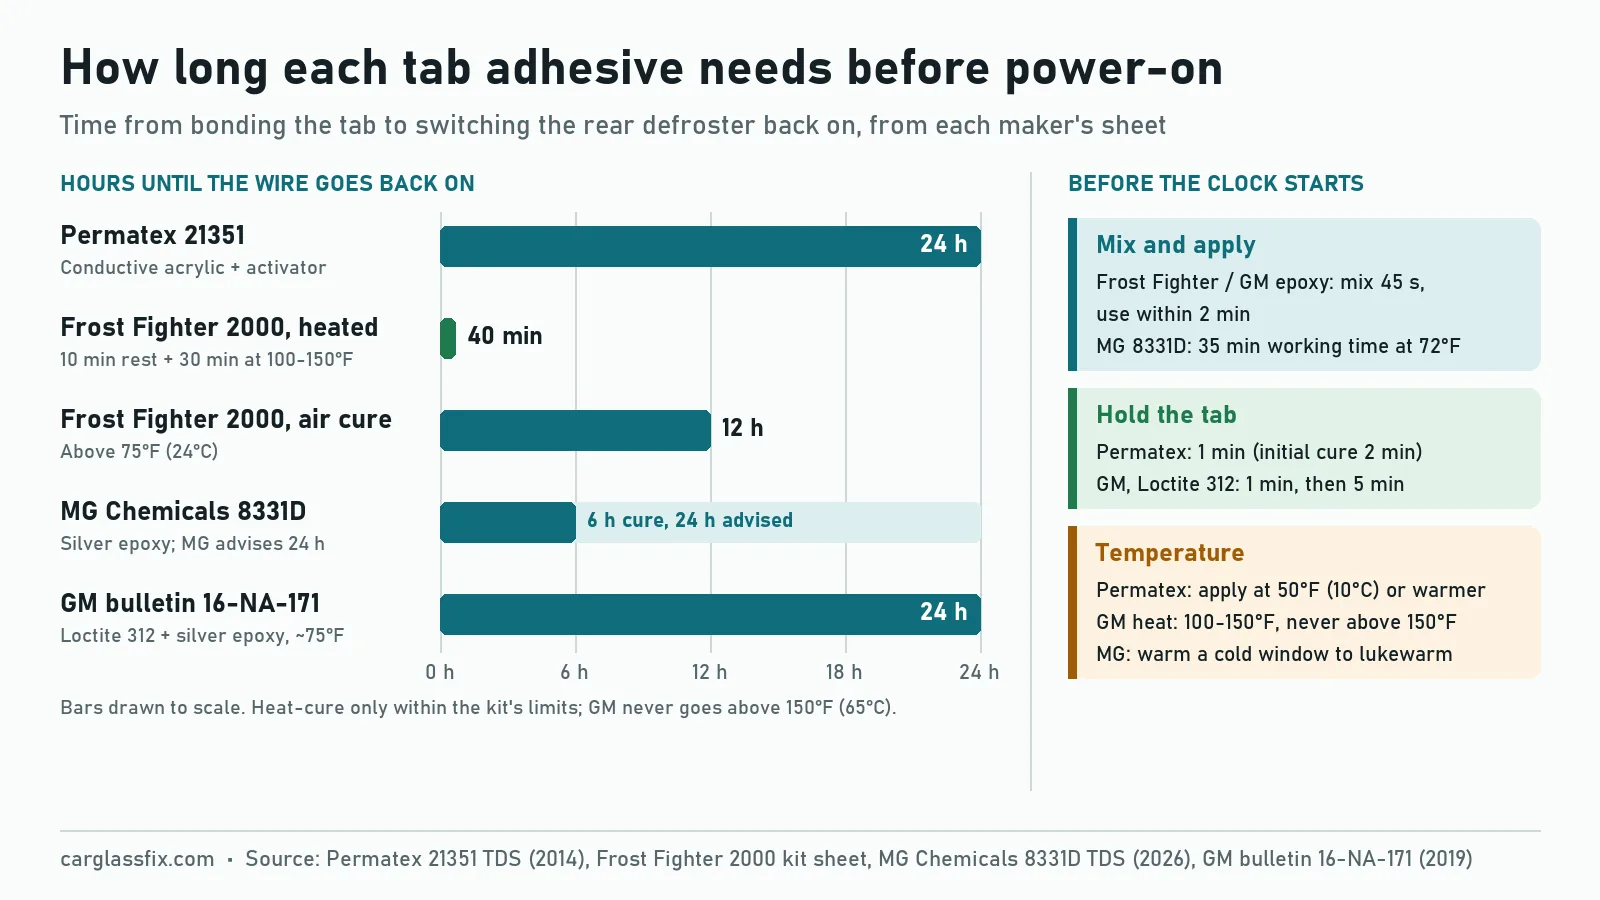
| Permatex 21351 tab adhesive | Conductive acrylic with an activator towelette | Hold the tab 1 min; initial cure 2 min | Apply at 50°F (10°C) or warmer | 24 hours |
| Frost Fighter 2000 Tab Bonding Kit | Silver epoxy, over 80% silver | Mix 45 s and use within 2 min | After 10 min, 100 to 150°F (38 to 65°C) for 30 min | 30 min heated, or 12 hours in air above 75°F (24°C) |
| MG Chemicals 8331D | Silver epoxy | Working time 35 min at 72°F (22°C) | Room temperature; warm a cold window to lukewarm | Cures in 6 hours; MG advises 24 hours |
| GM bulletin 16-NA-171 | Loctite 312 holds the tab; Frost Fighter epoxy covers it | Hold 1 min, wait 5 min; epoxy work time 2 min | 100 to 150°F, never above 150°F (65°C) | 24 hours at about 75°F |
| Frost Fighter 2010 solder paste kit | Solder paste with no-clean flux | Needs an intact metal pad on the bus bar | 200-watt iron, damp towel behind the glass | Not stated; sold for experts |
None of these makers publishes an amp rating for its bond. Frost Fighter says its silver content suits high-amperage tab bonding. MG Chemicals lists a resistivity of 0.0018 ohm-cm for cured 8331D. Permatex says a good joint reads 0 ohms between tab and grid. Henkel’s sheet for Loctite 312 lists bond strength and no electrical property. Frost Fighter’s Technical Bulletin 118 puts a healthy grid at 0.5 to 4 ohms, which draws well under 25 amps in most cases. In a GM fix for the 2008 to 2012 Chevrolet Malibu, the rear defogger feed runs through a 30-amp fuse.
Permatex’s instructions conflict. Its 2014 data sheet puts the activator on the glass only, with 2 minutes to dry. Its web page says window and tab, with 5 minutes. Follow the sheet in your kit.
How to reattach a rear defroster tab, step by step
The steps below combine GM bulletin 16-NA-171 with the Frost Fighter, Permatex and MG Chemicals instructions. Where your kit’s sheet differs, follow the kit.
How to reattach a rear window defroster tab
Warm the glass and switch off
Work indoors in winter and let the glass reach room temperature, as GM directs. Turn the defroster off. MG Chemicals also disconnects the battery.
Unplug the tab
Pull the tab out of its connector and note which way it faces. Replace a bent or broken tab with a new one.
Mask the spot
Tape off a small area around the original position to protect the black border and the glass.
Sand both surfaces
Scuff the tab foot and the bus bar with 500-grit paper until no oxidation shows. Do not sand through the bus bar.
Clean
Wipe both surfaces with isopropyl alcohol or the kit’s cleaner. With the Permatex kit, use the activator towelette on the glass only and let it dry for at least 2 minutes.
Mix and apply
For Frost Fighter’s epoxy, mix equal parts for 45 seconds and use it within 2 minutes. Spread it so it overlaps the bus bar by at least 1/8 inch (3 mm).
Set the tab
Press the tab on in its original orientation. Tape, a small clamp or a screwdriver tip holds it still while the adhesive sets.
Cure
After 10 minutes, Frost Fighter warms the spot to 100 to 150°F for 30 minutes. GM keeps a hand behind the glass and removes the heat once the glass feels hot. Without heat, wait the kit’s full cure time.
Reconnect and test
Push the connector back on after the cure. Check continuity, then run the defroster.
Test the joint before you trust it. Permatex says a multimeter should read 0 ohms between the tab and the grid. With the connectors off, Frost Fighter measures tab to tab and expects 0.5 to 4 ohms for the whole grid. A higher reading points to broken lines or a poor tab joint. Permatex also says to run the defogger for 15 minutes, or until it switches itself off, before the first drive. Never bypass the timer or relay permanently, because Frost Fighter warns this can overheat the circuit and the grid.
Frost Fighter, whose kit the GM and FCA bulletins name, shows the bonding method on its Doctor Defroster YouTube channel.
Can you solder a defroster tab?
A tab can be soldered back on, but the heat can crack the rear window. GM’s dealer procedure and the adhesive makers use conductive adhesive instead. Factory tabs are usually soldered to the bus bar, according to Frost Fighter. FCA’s Jeep bulletins call the part a solder terminal, and they still specify Frost Fighter’s silver epoxy for the repair.
MG Chemicals warns against soldering a tab back on with a flame, heat gun or iron, because the heat can crack the window. GM’s bulletin warns that heating the glass too much, or again before it cools, may break it.
Frost Fighter still sells a solder paste kit for experts, for bus bars with an intact metal pad. It calls for a 200-watt iron and a damp towel on the glass behind the joint. It recommends its adhesive kit for 95% of tab repairs. Before using an iron on any back glass, follow the vehicle or glass maker’s procedure. How the two auto glass types behave is covered in laminated vs tempered glass.
When the rear glass must be replaced instead
The rear glass needs replacing when too little bus bar coating is left at the tab spot to carry current, or when the automaker’s rules say so. Permatex says not to mount a tab where the grid has come off the glass, because there must be grid to complete the circuit.
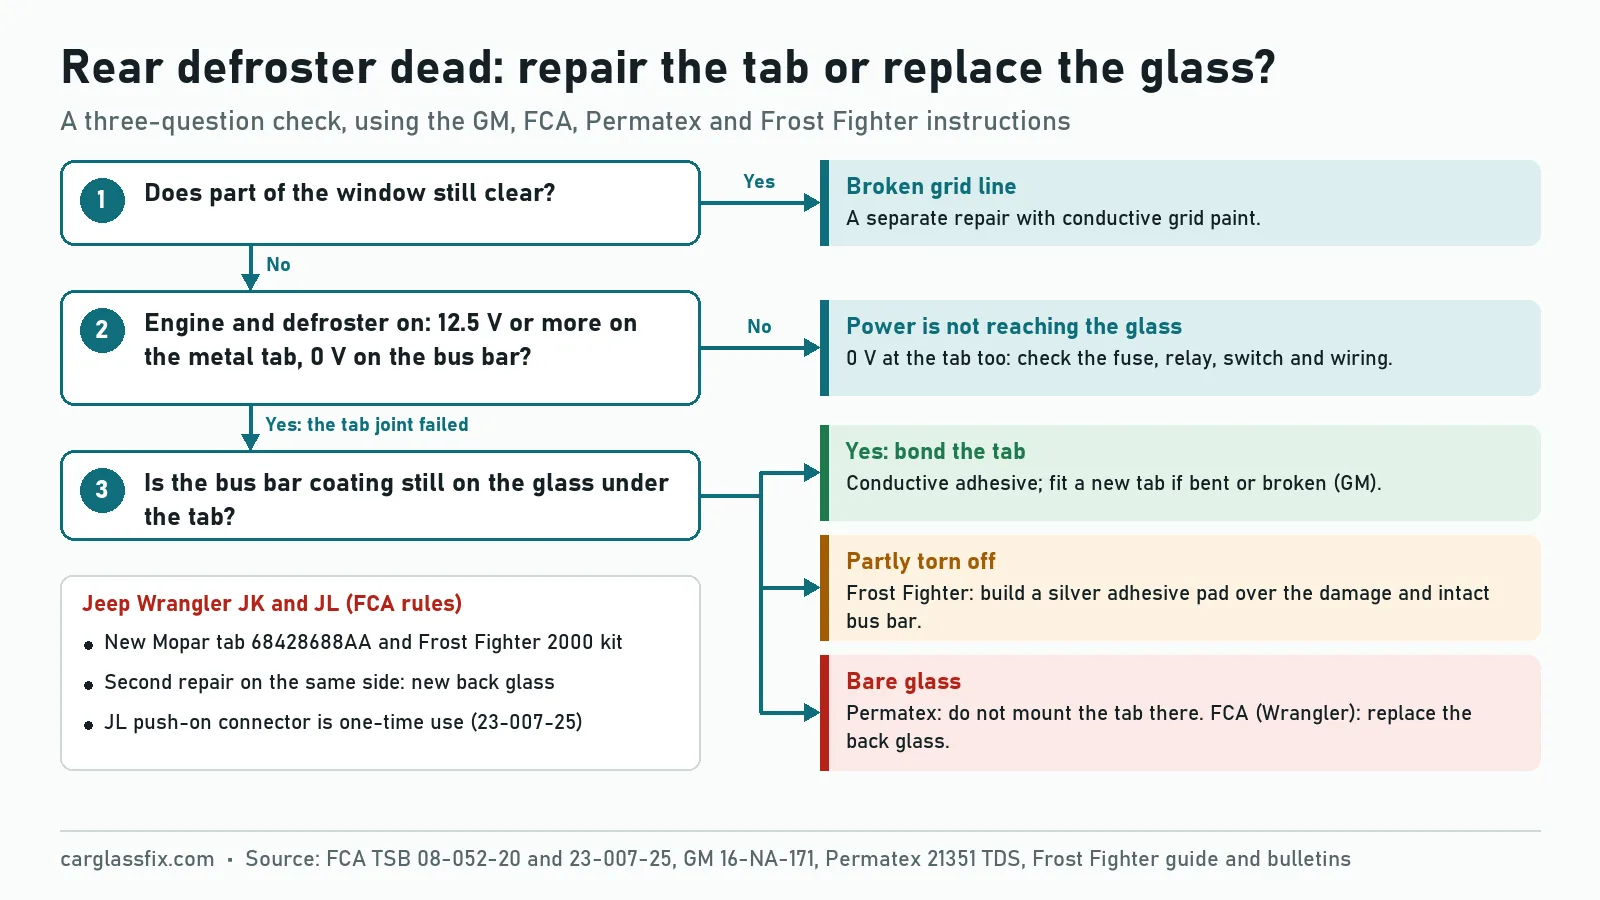
Partial damage can often be bridged. Frost Fighter masks the damage plus some intact bus bar with two layers of tape and fills the area with silver adhesive. The new tab sits on the wet pad.
FCA is stricter. For the 2017 to 2018 Wrangler (JK) and the 2018-on Wrangler (JL), its bulletin 08-052-20 requires a new tab and the Frost Fighter 2000 kit. Bare glass under the tab means the back glass must be replaced. A second tab repair on the same side also means new glass. Frost Fighter warns that removing window tint can pull coating off the grid, so read how to remove car window tint first. The glass swap is described in how to replace a rear windshield.
What a tab repair costs and how long it takes
A tab repair costs the price of a conductive adhesive kit, and most of the time goes to curing. Frost Fighter lists its 2000 Tab Bonding Kit at $69.79 and a bundle with two universal tabs and a connector at $99.95. The company says one kit makes 3 to 5 repairs and keeps for one year unopened. Its 12-volt defroster test lamp is $16.45. These prices were read on frostfighter.com on October 24, 2026.
Dealer labor is short. GM’s warranty time for reconnecting a rear defroster tab is 0.6 hour. FCA allows 0.2 hour to replace one JL Wrangler connector and 0.3 hour for both. The car then waits for the cure, which is 24 hours under GM’s bulletin and Permatex’s sheet. A heat-cured Frost Fighter repair takes about 40 minutes, counting the 10-minute rest. If the coating is gone, the job becomes a glass replacement, priced in rear windshield replacement cost.
Frequently asked questions
Can I use super glue to reattach a defroster tab?
No. Frost Fighter says super glue, five-minute epoxy and regular glue are not conductive enough, and some are insulators. GM uses Loctite 312 only to hold the tab in place and covers the joint with silver epoxy.
How long after the repair can I turn on the rear defroster?
Permatex says 24 hours. MG Chemicals’ 8331D cures in 6 hours, and MG advises 24 hours before reconnecting. A Frost Fighter repair is ready after 30 minutes of heat at 100 to 150°F, or 12 hours in air above 75°F.
Which rear defroster tab is positive?
On North American cars the positive tab is usually on the driver’s side, according to MG Chemicals. Confirm it with a test light: with the defroster on, the positive side shows 12 volts to ground.
Can a rear defroster be repaired without new glass?
Yes, in many cases. A loose tab is bonded back with conductive adhesive, as long as bus bar coating remains under it. Faults on the car’s side, such as the fuse or relay, are covered in our guide to a rear window defroster not working.
Why did my repaired tab stop working?
MG Chemicals lists three causes of a soft repair: the wrong mix ratio, poor mixing and a cold window. Frost Fighter often sees tabs glued back with non-conductive adhesive. Powering the grid before the full cure also goes against each maker’s instructions.
Sources
- GM service bulletin 16-NA-171, Reconnection of Rear Window (Defroster) Contact or Tab (February 2019) (checked 24 October 2026)
- GM bulletin PI0857, Rear Window Defogger Inoperative (November 2012)
- FCA service bulletin 08-052-20, Rear Window Defroster Inoperable (May 2020) (checked 24 October 2026)
- FCA technical service bulletin 23-007-25, Rear Defroster Inoperative (February 2025) (checked 24 October 2026)
- Permatex Rear Window Defogger (Tab Adhesive) technical data sheet, revised April 2014 and Permatex 21351 product page and instructions
- MG Chemicals 8331D Silver Conductive Epoxy Adhesive technical data sheet (version 3.4, May 2026)
- MG Chemicals: How to Repair a Rear Window Defroster
- Frost Fighter 2000 Tab Bonding Kit instruction sheet and product page
- Frost Fighter: Defroster Tab Repair Questions and Defroster Repair and Troubleshooting Guide
- Frost Fighter 2010 Solder Paste Kit and repair solutions price list (prices read 24 October 2026)
- Frost Fighter Technical Bulletin 110, Removing and reattaching defroster tabs, Technical Bulletin 116, Repairing broken defroster tabs and Technical Bulletin 118, Measuring defroster health
- Henkel: LOCTITE AA 312 technical data sheet (July 2018) and LOCTITE SF 736 technical data sheet (January 2015)

Similar Posts