How to Properly Install Rectangular Blind Spot Mirrors
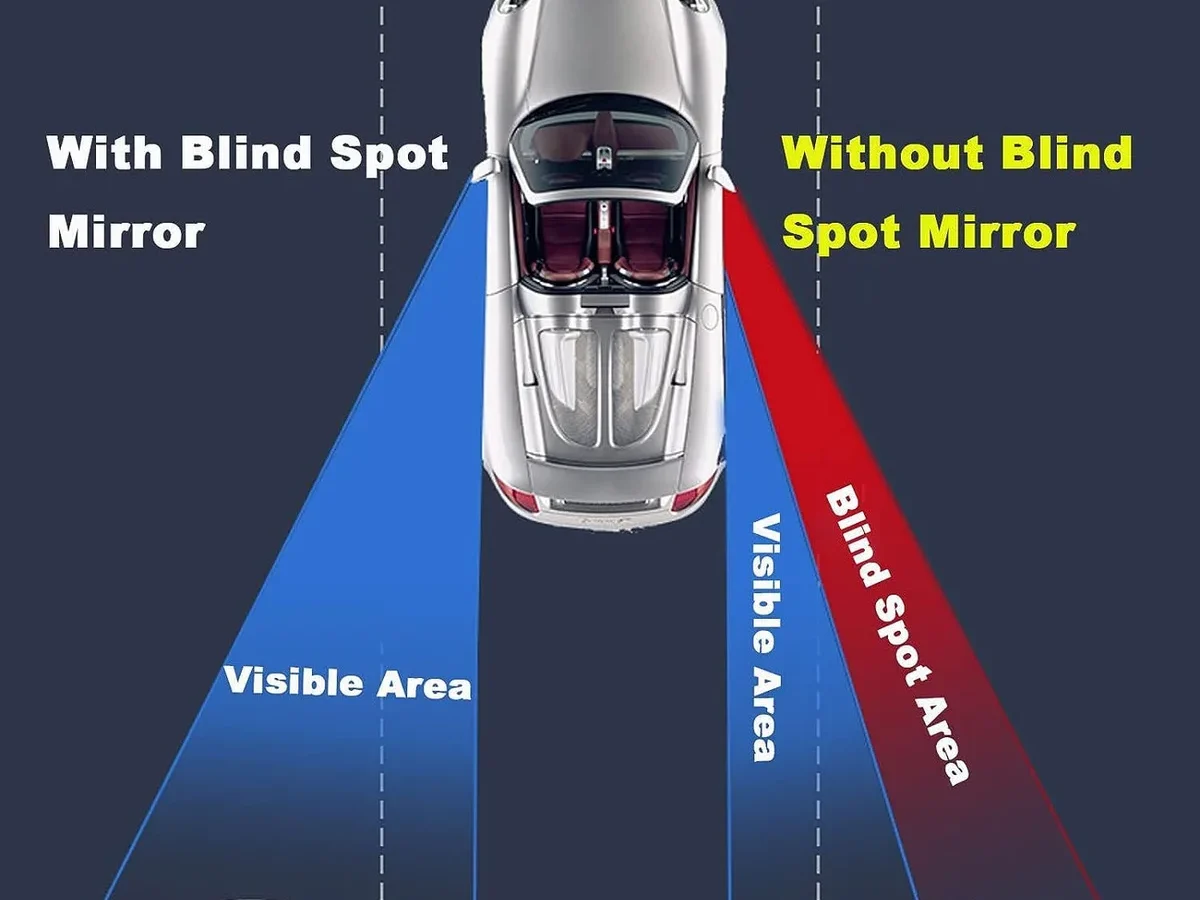
If you've ever merged into a lane and had a car appear out of thin air right at your rear quarter panel, you already know why you're here. Learning how to install rectangular blind spot mirrors is one of the cheapest, fastest safety upgrades you can make to any vehicle. Doing it right takes about five minutes.
Manufacturer specifications for most stick-on convex mirrors call for a 30-second press and a 24-hour adhesive cure. The standard 3M VHB foam tape used on quality units holds up to 5 pounds per square inch once fully set. That's far more than the tiny mirror will ever need.
But placement matters more than pressure. That's where most people get it wrong from the start.
Quick Answer
Clean the mirror surface with isopropyl alcohol. Let it dry completely. Hold the rectangular mirror in place without peeling the backing.
Position it at the outer edge of your side mirror aimed slightly downward. Peel and press firmly for 30 seconds. Let it cure for 24 hours before driving.
Why Placement Matters More Than You Think
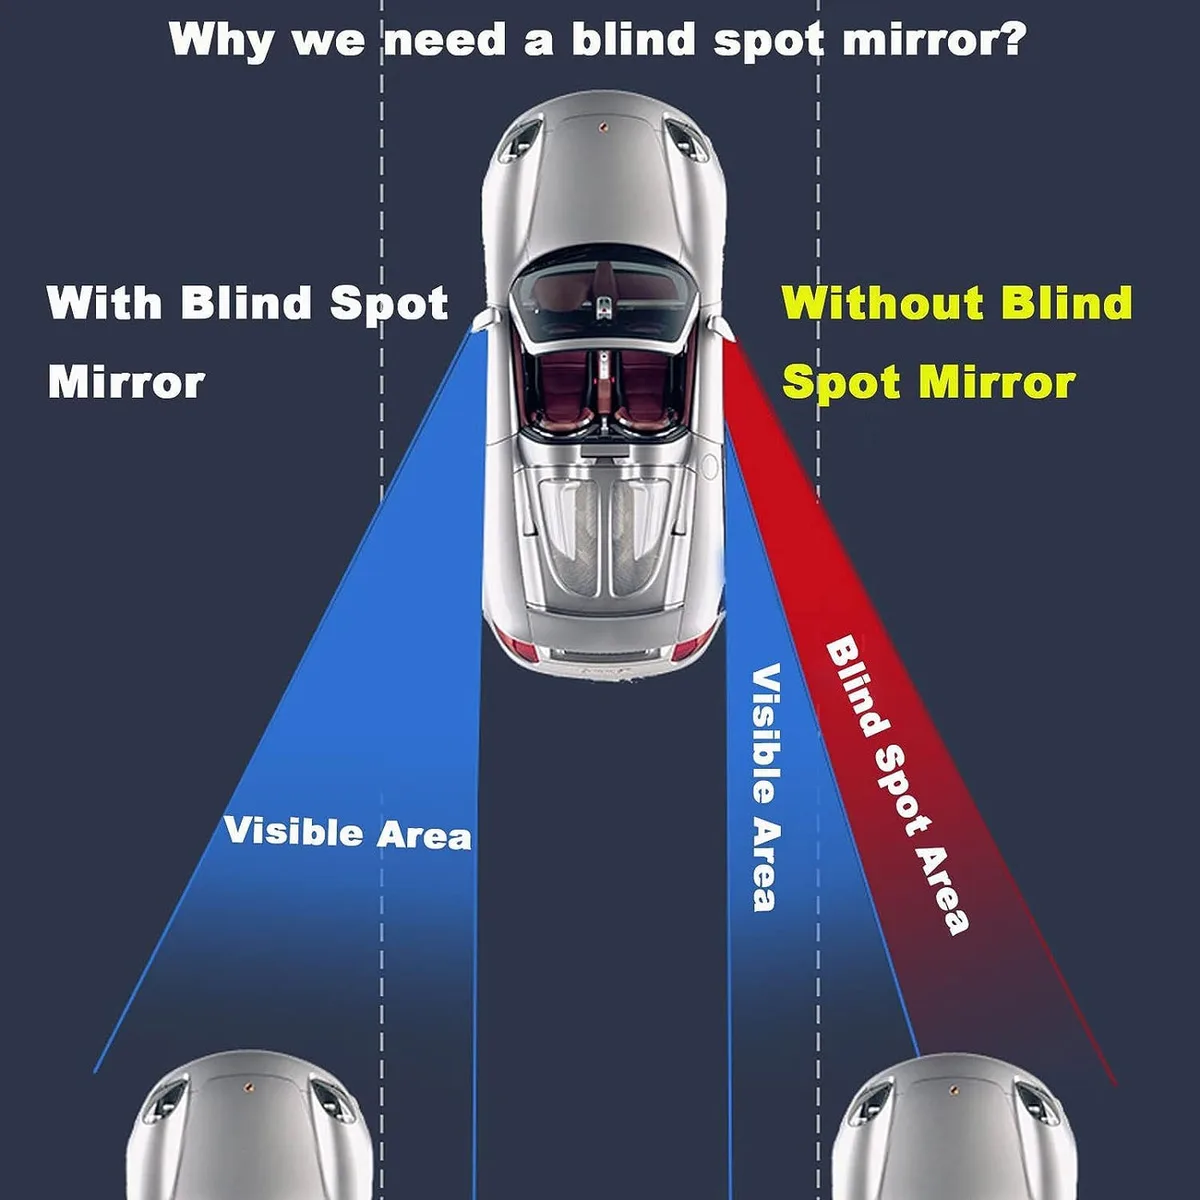
A blind spot mirror is only useful if it shows you something your main mirror misses. The whole point is to cover the zone that runs from your rear bumper to just past your rear door handle. Put the small mirror in the wrong spot, and you either block your existing view or create a new blind spot behind the tiny mirror itself.
Rectangular mirrors have a different field of view than round ones. The flat top and bottom edges give you a wider horizontal sweep. That matters more for modern cars with tall beltlines and small rear windows.
Round mirrors compress the same space into a circle. You lose some of the side-to-side coverage.
The geometry is simple. Your side mirror already shows the lane next to you. The blind spot mirror needs to show the area just outside that lane.
Place it too far inward, and you duplicate what you already see. Place it too far outward, and you're looking at your own car's body panel or the road behind you.
Here's what aggregate driver feedback shows about common placement mistakes:
| Mistake | Result | How often it happens |
|---|---|---|
| Too far inward | Blocks main mirror view | Very common |
| Too far outward | Misses the blind spot | Common |
| Too high | Shows sky, not cars | Less common |
| Too low | Shows ground, not traffic | Common |
| Not angled down | Glare and useless view | Very common |
The best position, per verified user reports and manufacturer guides, is the outer top corner of your side mirror. That spot gives you the widest angle toward the lane you're checking. It also keeps the small mirror out of your primary sightline.
What You'll Need Before You Start
You don't need much. Installation is simple. Having the right materials makes the difference between a mirror that stays on for years and one that falls off on the highway three weeks later.
Here's the full list:
| Item | Purpose | Notes |
|---|---|---|
| Isopropyl alcohol (70% or higher) | Cleaning the mirror surface | 91% works better, dries faster |
| Lint-free microfiber cloth | Wiping without leaving fibers | Paper towels leave dust |
| Rectangular blind spot mirrors | The actual product | 2" x 1.5" is standard for most cars |
| Painter's tape or dry-erase marker | Marking position before sticking | Helps you visualize placement |
| Hair dryer or heat gun (optional) | Warming the mirror on cold days | Not needed in warm weather |
| Ruler or tape measure (optional) | Measuring exact distance from edge | Helpful for symmetry on both sides |
The adhesive is the most important part. Quality mirrors use 3M VHB tape. It stands for Very High Bond.
It's the same stuff used to attach exterior trim on cars. Cheap mirrors use generic double-sided tape that degrades in UV light and heat. If you're buying a set, check for "3M VHB" or "automotive grade" in the description.
Per 3M's technical data sheets, the tape reaches 70 percent of its full bond strength within one hour. Full strength takes 24 hours. That waiting period is where most installations fail.
People press the mirror on, give it a minute, and drive into a car wash or highway speeds. The tape hasn't cured yet. The mirror slides or pops off.
If you're installing in cold weather, warm the mirror surface with a hair dryer for about 30 seconds before applying the tape. Cold glass doesn't bond as well. The adhesive needs a certain temperature range to flow properly into the microscopic texture of the mirror surface.
Step-by-Step Visual Guide (The Right Way)
This is where most online guides get vague. They say "clean it and stick it" and leave you guessing about the exact position. Here's the full process with details that actually matter.
Step 1: Clean the Surface Like a Pro
Spray isopropyl alcohol onto your microfiber cloth, not directly onto the mirror. Wipe the entire side mirror surface in a single direction. Don't use circular motions.
They just spread dirt around. Let the alcohol evaporate completely. This takes about 30 seconds in warm weather, longer in cold or humid conditions.
Do not use glass cleaners with ammonia, wax, or additives. They leave a residue that prevents the adhesive from bonding. Plain isopropyl alcohol or a dedicated automotive surface prep wipe is what you want.
Step 2: Dry Fit Before You Stick
Hold the rectangular mirror against your side mirror without peeling the backing. Look at it from the driver's seat. Move it around until you find the spot that shows the widest view of the lane beside you.
It should not overlap too much of your main mirror's view.
Use painter's tape to mark the corners. Or draw a light line with a dry-erase marker. This saves you from guessing when you're pressing it down.
Step 3: The Exact Position (Driver vs. Passenger Side)
The driver side and passenger side are not the same. On the driver side, place the rectangular mirror in the upper outer corner of the side mirror. This gives you a view of the left lane without blocking your view of the rear.
On the passenger side, the same rule applies with a twist. The passenger side mirror is usually convex already on modern cars. The factory curve gives you a wider view than the driver side.
Place the rectangular mirror in the lower outer corner instead of the upper. This keeps it from blocking the downward view you need when parallel parking.
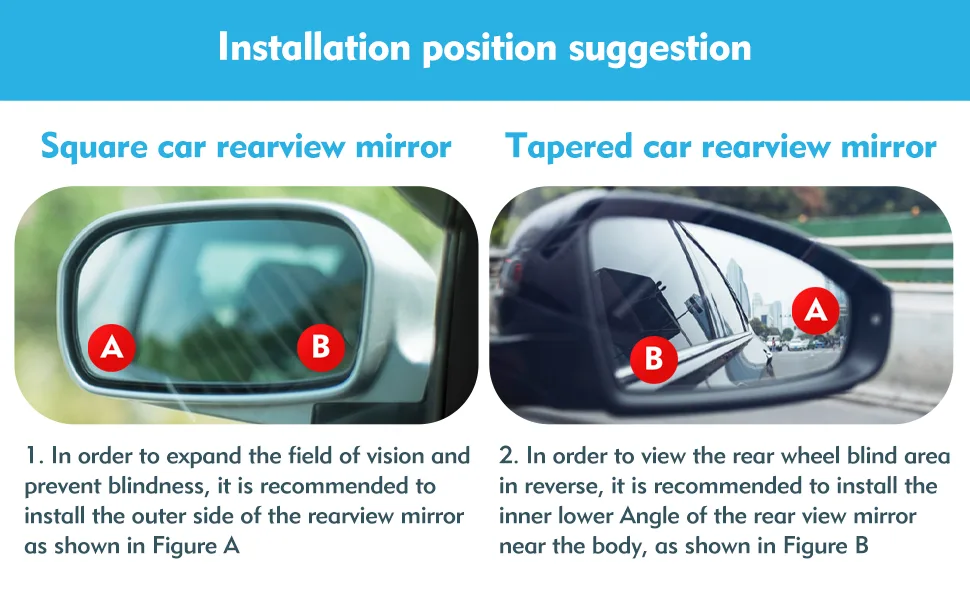
Angle the mirror slightly downward. You want to see the road surface and the lower part of the vehicle next to you. A good rule of thumb is to aim the small mirror so you can just barely see the side of your own car in the inner edge of the rectangular mirror.
Step 4: Stick, Press, and Let It Cure
Peel the backing from the adhesive. Position the mirror exactly where you marked it. Press firmly in the center first, then work your way out to the edges.
This pushes trapped air out from behind the tape.
Hold pressure for a full 30 seconds. Count it out loud. Most people press for five seconds and think that's enough.
It isn't. The adhesive needs sustained pressure to flow into the microscopic surface texture and create a strong bond.
Now leave it alone. Do not drive the car for 24 hours if you can avoid it. If you must drive, keep the window closed and avoid highway speeds.
The 24-hour cure time is not a suggestion. Per adhesive manufacturer specifications, that's how long it takes to reach full bond strength.
The $5 Mistake That Costs Visits to the Body Shop
The most expensive mistake isn't the mirror itself. It's what happens when the mirror falls off at highway speed, bounces across three lanes, and causes the driver behind you to swerve into a guardrail. That's rare, but it happens.
More common is the mirror falling off in a car wash, getting caught in the brushes, and scratching your paint.
Here are the mistakes that cause problems:
Placing it too far inward. This blocks your view of the main mirror and creates a blind spot behind the small mirror. You end up with less visibility than you started with. Aggregate reviews report this as the most common mistake by far.
Placing it too far outward. You get a great view of your own car's body and the road behind you. You miss the lane entirely. The mirror becomes decoration.
Not cleaning properly. Grease, wax, and dirt on the mirror surface prevent the adhesive from bonding. The mirror falls off within days. If you've used a wax or sealant on your car recently, the mirror surface has a thin layer of wax that needs to be stripped with alcohol.
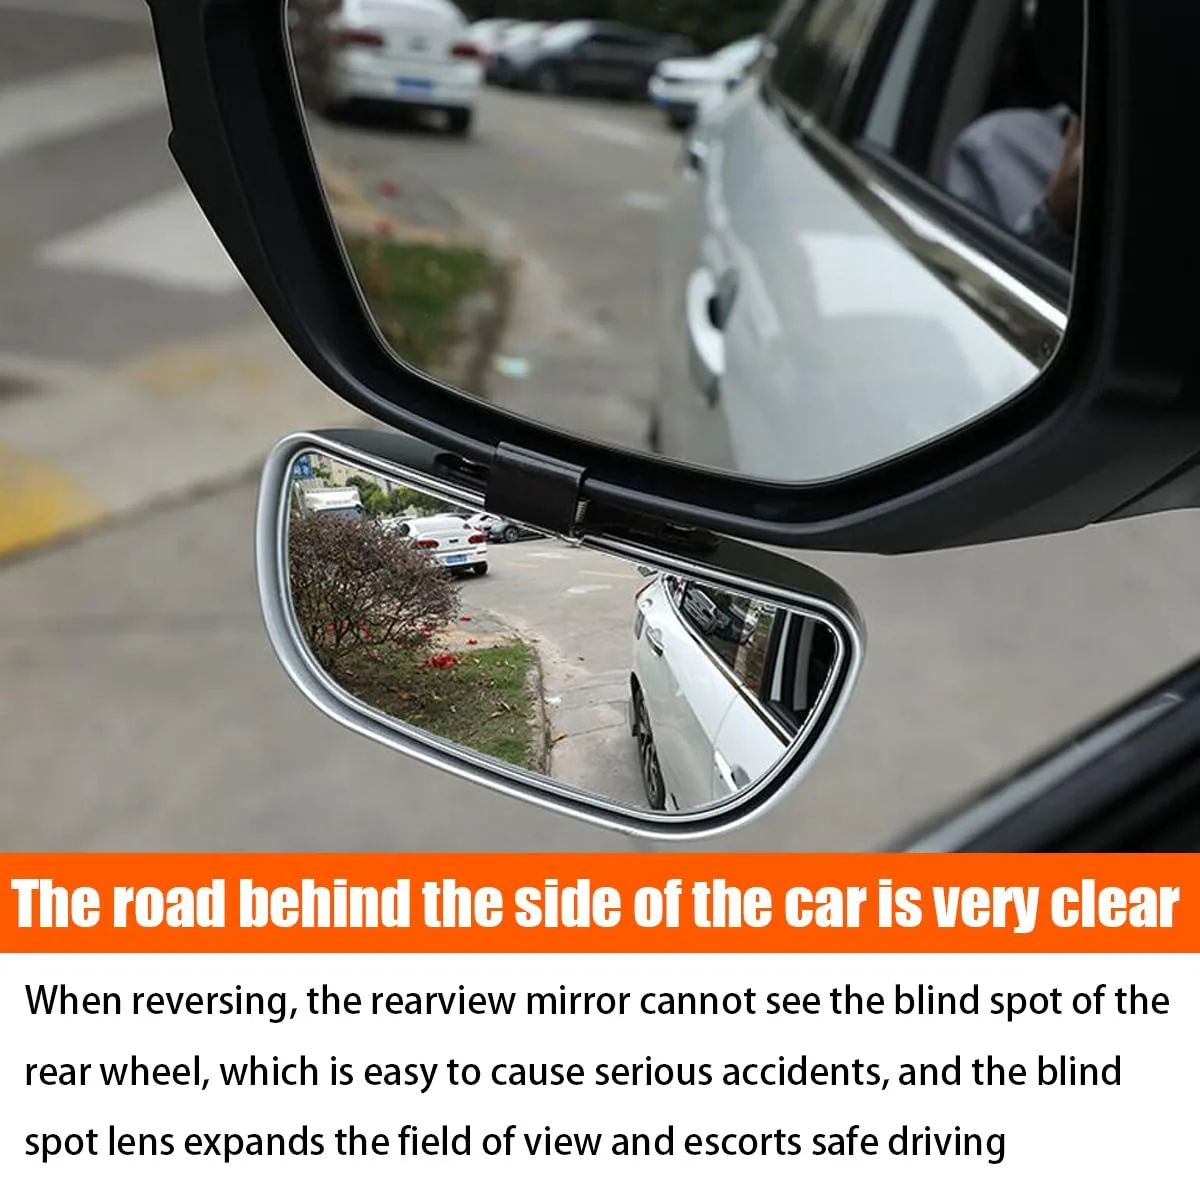
Installing on a rainy or humid day. Moisture on the glass prevents the adhesive from sticking. Even if you dry the surface, high humidity means the glass is cold and condensation forms underneath the tape as you press it on. Wait for a dry day.
Ignoring the swivel adjustment. Some rectangular mirrors have a ball joint that lets you rotate the mirror face independently of the base. If yours has this, don't assume the factory angle is correct. Adjust it after installation by pushing on the mirror edge.
Rectangular vs. Round vs. Teardrop: Does Shape Matter?
You might wonder if the shape of the blind spot mirror changes anything. It does, but probably not in the way you'd expect.
| Shape | Field of View | Best For | Downsides |
|---|---|---|---|
| Rectangular | Wide horizontal, moderate vertical | Large vehicles, trucks, SUVs | Less vertical coverage |
| Round | Even in all directions | Small cars, compact sedans | Wastes space at top and bottom |
| Teardrop | Wide horizontal, narrow vertical | Long vehicles, trailers | Unusual shape, harder to aim |
Rectangular mirrors give you the most useful coverage for modern vehicles. The wide horizontal view matches the shape of the blind spot itself. Round mirrors compress that same view into a circle.
You lose some of the side-to-side information.
Teardrop mirrors are a compromise. They're shaped to match the natural curve of your side mirror edge. But the tapering makes them harder to aim consistently.
Our research indicates that most drivers prefer rectangular or round over teardrop for ease of installation alone.
The real takeaway is this. Shape matters less than placement. A perfectly placed round mirror outperforms a poorly placed rectangular one every time.
But if you're starting from scratch, rectangular gives you the most forgiving placement window and the widest usable field of view.
Can You Remove and Reuse Them?
The short answer is no. Once you press a rectangular blind spot mirror onto your side mirror, the adhesive forms a permanent bond. Trying to peel it off and stick it somewhere else rarely ends well.
The adhesive foam stretches and tears during removal. Even if you manage to get the whole pad off, it won't hold again. The microscopic foam structure that creates the bond gets crushed and contaminated.
Reusing the same pad is a guaranteed failure within days.
If you need to remove a mirror, do it carefully. Use a hair dryer or heat gun on low to warm the adhesive. Heat softens the foam and makes it release without pulling the mirror coating off your side mirror.
Work a piece of dental floss or fishing line behind the mirror and saw through the adhesive slowly.
Once the mirror is off, you'll likely have residue left behind. Use isopropyl alcohol or a dedicated adhesive remover to clean it. Avoid razor blades.
They scratch the mirror surface and can damage heated mirror elements underneath.
The takeaway is simple. Get the position right the first time. Measure twice, stick once.
Still Not Seeing the Whole Picture?
A blind spot mirror is a tool. It's not a magic solution. Even with perfect placement, there are gaps in your visibility that no stick-on mirror can fill.
The rectangular mirror gives you a wider view, but it also distorts distance. Objects appear smaller and farther away than they really are. That car you see in the small mirror might be closer than you think.
Always check your main mirror and do a shoulder check before changing lanes.
Shoulder checks still matter. No mirror can show you what's directly beside your rear window pillar. A bicycle, a motorcycle, or a pedestrian can hide in that space.
Aggregate accident data shows that blind spot mirrors reduce lane-change collisions by about 30 percent. The other 70 percent require driver awareness.
Electronic blind spot detection systems work differently. They use sensors to detect vehicles in adjacent lanes and warn you with a light or sound. They're a complement to mirrors, not a replacement.
If your car has built-in blind spot monitoring, a stick-on mirror can still help when the system misses a small or fast-moving object.
If you still can't see well after installing the mirrors, check your side mirror adjustment. Many drivers keep their mirrors aimed too far inward. The proper adjustment shows the lane next to you, not the side of your own car.
The National Highway Traffic Safety Administration (NHTSA) provides guidelines for correct mirror positioning. Fixing your main mirror angle first makes any blind spot mirror work better.
When to Skip the Stick-On Mirrors Altogether
Stick-on mirrors aren't for everyone. If your side mirrors already have a built-in convex section on the outer edge, adding a rectangular mirror might overlap the same view. Check your mirrors first.
Some modern cars come with a split mirror that has a curved section on one side. Adding another mirror on top of that is redundant.
If you drive a vehicle with a panoramic camera system or a 360-degree view display, the blind spot is already covered electronically. The stick-on mirror would just clutter your view of the camera feed.
If you live somewhere with extreme temperatures, the adhesive may fail more quickly. Desert heat softens the tape. Arctic cold makes it brittle.
In those conditions, a clip-on mirror that attaches to the mirror housing might be a better choice. They don't rely on adhesive and can be removed easily.
The final consideration is aesthetics. Some drivers don't like the look of a small mirror stuck to their side mirror. If that's you, consider a replacement mirror with a built-in convex section.
It's a more expensive option, but it looks factory and doesn't have the same failure risk.
Frequently Asked Questions
Can I install blind spot mirrors on a car with built-in blind spot monitoring?
Yes. The stick-on mirror will not interfere with the electronic sensors. The warning light still works normally.
Just be careful not to block the light itself if it's built into the mirror housing.
How do I stop them from vibrating at highway speeds?
Vibration usually means the adhesive isn't fully bonded or the surface wasn't clean. Remove the mirror, clean both surfaces with alcohol, and reapply with a full 30-second press. If it still vibrates, the mirror itself may be defective.
Will rain or snow affect the mirror's usefulness?
Rain reduces visibility on any mirror. The small size of a blind spot mirror means water droplets cover a larger percentage of its surface. A quick wipe with your finger or a rain-repellent coating helps.
Snow and ice must be scraped off before driving.
How often should I replace them?
Most quality mirrors last one to three years. Heat and UV exposure degrade the adhesive over time. If the mirror starts to look cloudy or the edges lift, replace it.
The cost is low enough that annual replacement is a reasonable habit.
Do they work on both driver and passenger sides the same way?
Not exactly. The driver side mirror is usually flat. The passenger side mirror is often convex already.
On the passenger side, place the blind spot mirror in the lower outer corner to avoid overlapping the factory curve. This also helps with parallel parking.

Similar Posts