Windshield Pinch Weld: What It Is and Why Rust Matters
Senior Automotive Glass Diagnostic Specialist & Master Technician at CarGlassFix · AGSC Master Certified Auto Glass Technician, NGA Certified Installer, I-CAR Automotive Safety Specialist · 12+ Years in Automotive Glazing, Windshield Structural Bonding, ADAS Camera Calibration & Precision Chip Restoration
A windshield pinch weld is the painted metal flange around the windshield opening that the urethane adhesive bonds the glass to. Installers trim the old urethane to about 0.5 to 2 mm, prime every bare-metal scratch and remove all rust. Sika’s guideline sends rust holes, or rust over 24 square inches, to a body shop.
What a windshield pinch weld is
A windshield pinch weld is the metal flange around the windshield opening, and the glass is bonded to it. CarParts.com describes it as a layered seam where body panels overlap and are spot-welded together. A bead of urethane adhesive joins the edge of the glass to the flange. The factory E-coat and paint on the flange protect it from rust.
The bond does safety work. FMVSS 212 requires a vehicle with passive restraints, such as airbags, to keep at least 50 percent of the windshield edge on each side in place in a frontal barrier crash at up to 30 mph (48 km/h). PPG warns that glass not properly bonded to the flange can change how the body reacts in a collision and in normal body flex. Ford’s repair procedures call the pinch weld a structural component of the vehicle. I-CAR links a sound pinch weld to the upper body structure, to keeping occupants inside the car and possibly to passenger airbag deployment. The airbag side is covered in can windshield replacement affect airbags.
Full cut vs short cut: how much old urethane stays on
The US replacement standard names one removal method for a urethane-set windshield: the full cut. AGRSS 005-2022 section 6.14 says only the full cut method should be used for polyurethane retention systems. Section 3.11 defines it as trimming the old bead to about 1 to 2 mm wherever the bead is sound and the metal is not defective.
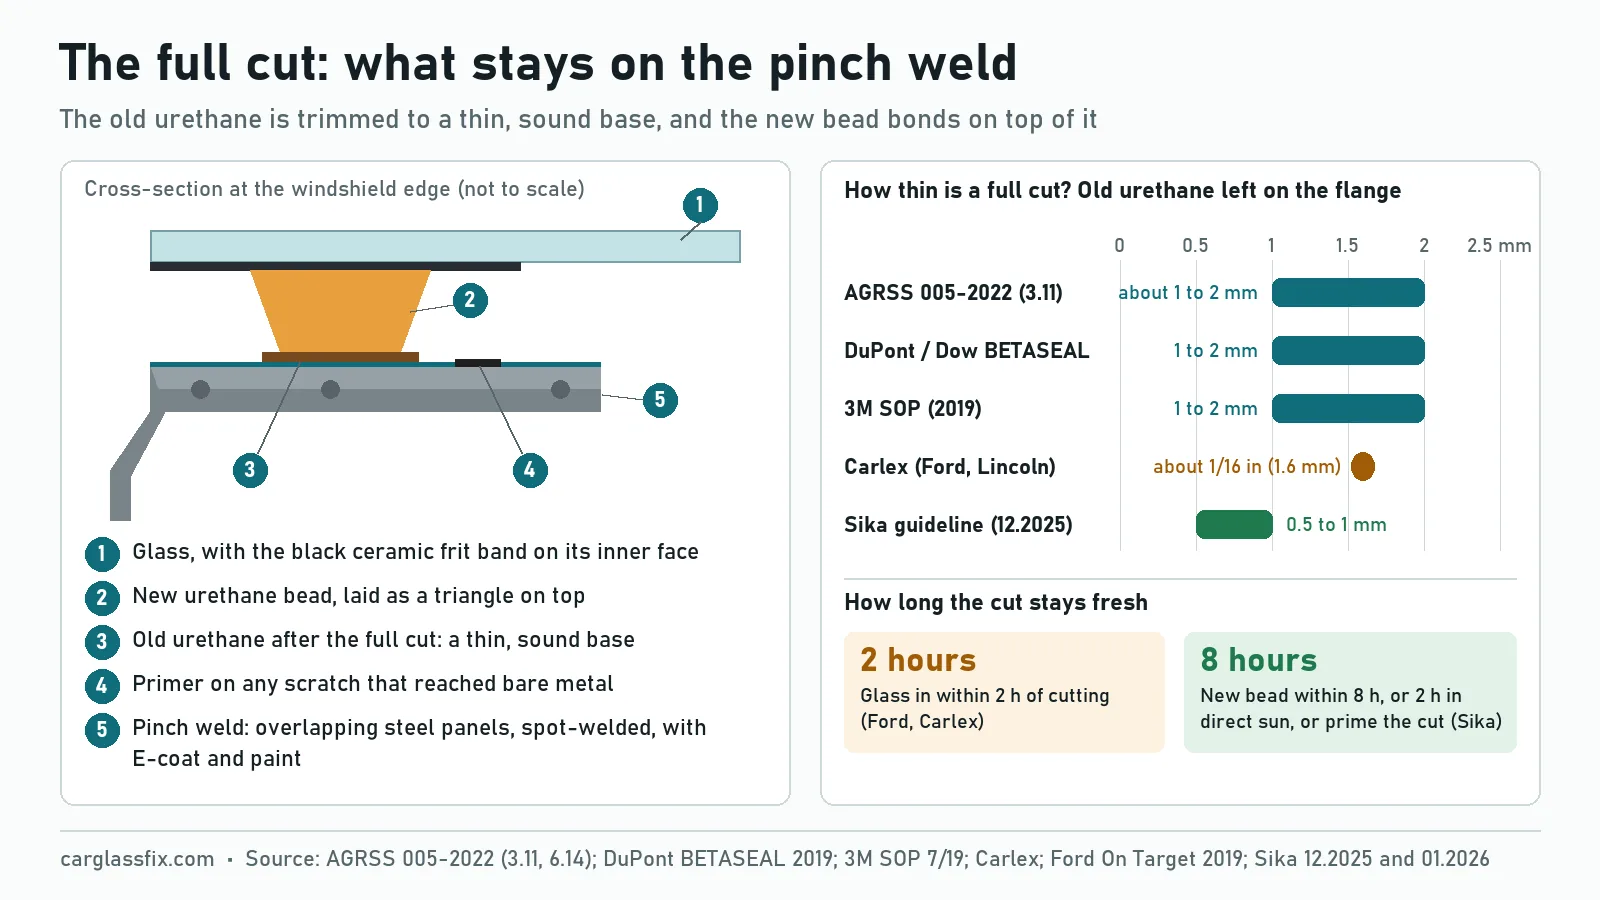
Adhesive makers set slightly different heights. AGRSS section 6.1 tells the shop to follow the instructions of the adhesive it uses.
| Source | Old urethane left on the pinch weld | Time limit after the cut |
|---|---|---|
| AGRSS 005-2022, section 3.11 | About 1 to 2 mm (0.04 to 0.08 in) | Not set |
| DuPont and Dow BETASEAL | A 1 to 2 mm base | Not stated |
| 3M windshield SOP (2019) | 1 to 2 mm | Not stated |
| Carlex (Ford and Lincoln glass) | A level bed about 1/16 in (1.6 mm) thick | Glass installed within 2 hours |
| Ford (On Target, 2019) | Not stated | Glass installed within 2 hours; cut urethane goes inactive |
| Sika guideline (12.2025) | 0.5 to 1 mm (0.02 to 0.04 in) | New bead within 8 hours, or 2 hours in direct sun |
A short cut leaves a thick layer of old urethane and adds little new adhesive. Sika calls it unacceptable and potentially very dangerous. Sika says it voids every drive-away time rating. Sika requires removal down to the paint instead when the flange was repainted or damaged, the old urethane is loose, or butyl or silicone was used before. The full procedure is in how to install a windshield by yourself. Sticker residue on the glass is a separate job, covered in how to remove adhesive from a windshield.
Scratches and bare metal: what gets primer
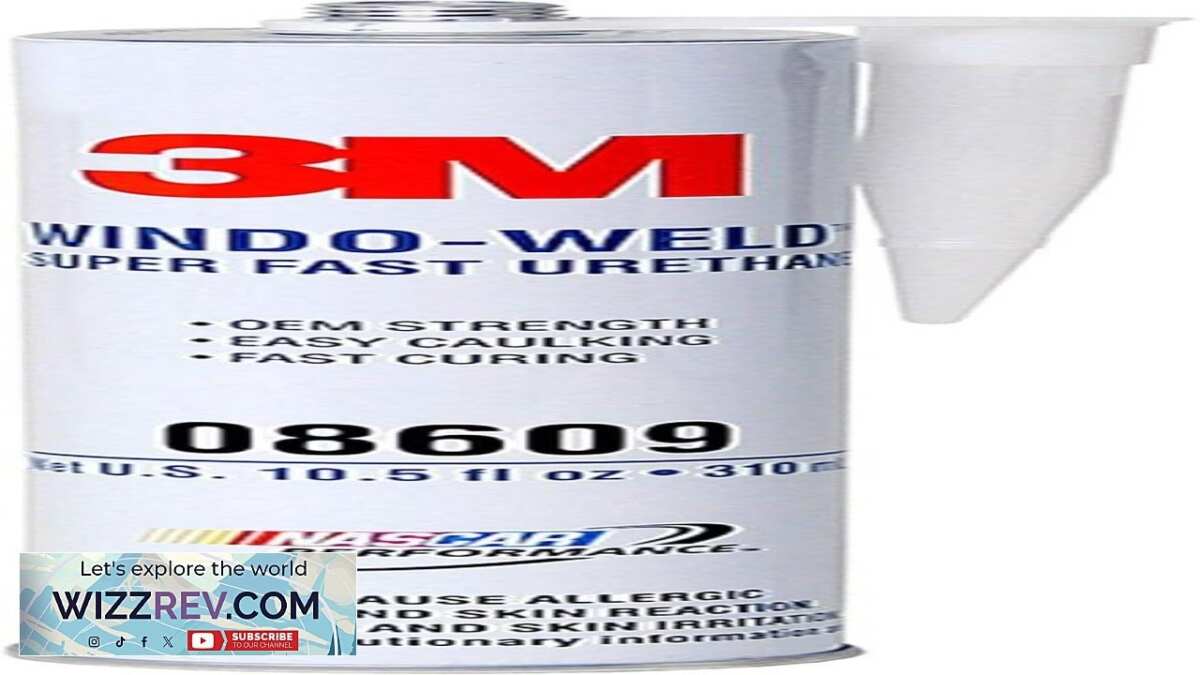
Every spot where the cut-out tool reached bare metal gets the adhesive maker’s primer before the new bead goes on. AGRSS defines primer as a product the adhesive maker designs to help adhesion and to shield the surface from the environment. I-CAR tells technicians to inspect the flange for scratches made during glass removal. Carlex tells installers to avoid scratching the pinch weld and to prime every scratch.
| Maker | Small scratch or nick | Larger bare metal | Rule to note |
|---|---|---|---|
| Sika (12.2025) | Up to 5 cm² (1 sq in): one coat of Primer-207 AGR | 5 to 150 cm² (1 to 24 sq in): two coats | Over 150 cm²: body or paint shop |
| DuPont BETASEAL (2019) | Two coats of BETAPRIME 5504G | Two coats of BETAPRIME 5504G | 2 minutes of drying per coat at 20 °F and above |
| 3M | Single Step Primer | Two-part epoxy primer, cured and scuffed, then Single Step Primer | Primer dries 5 to 10 minutes |
| GM | Primer on nicks, scratches and primed areas only | Flange refinished after rust or metal repair | No primer on the old urethane bead |
| PPG (paint maker) | Not covered | Two-component epoxy primer on bare metal | Epoxy is the only coating between metal and urethane |
For scale, a US quarter covers about 4.6 cm², just under Sika’s one-coat limit. Sika’s 24-square-inch limit equals the area of a 4 x 6 in photo print. Primer brands are not mixed. GM says not to intermix primers or adhesives. DuPont says to use no other maker’s primers or cleaners with BETASEAL. Primer matters at the factory too. Kia recalled 2014 to 2016 Cadenza sedans because parts of the windshield glass may have lacked enough primer, which could let the glass loosen and separate.
Rust on the pinch weld: when a glass shop must stop
All rust has to come off before a new windshield goes in, and some rust is beyond a glass shop’s job. I-CAR says pinch weld corrosion must be removed before installation, whatever its extent. AGRSS section 4.1 says a technician who finds a condition that could compromise the bond shall not start or finish the installation. The owner must then be told verbally and in writing.
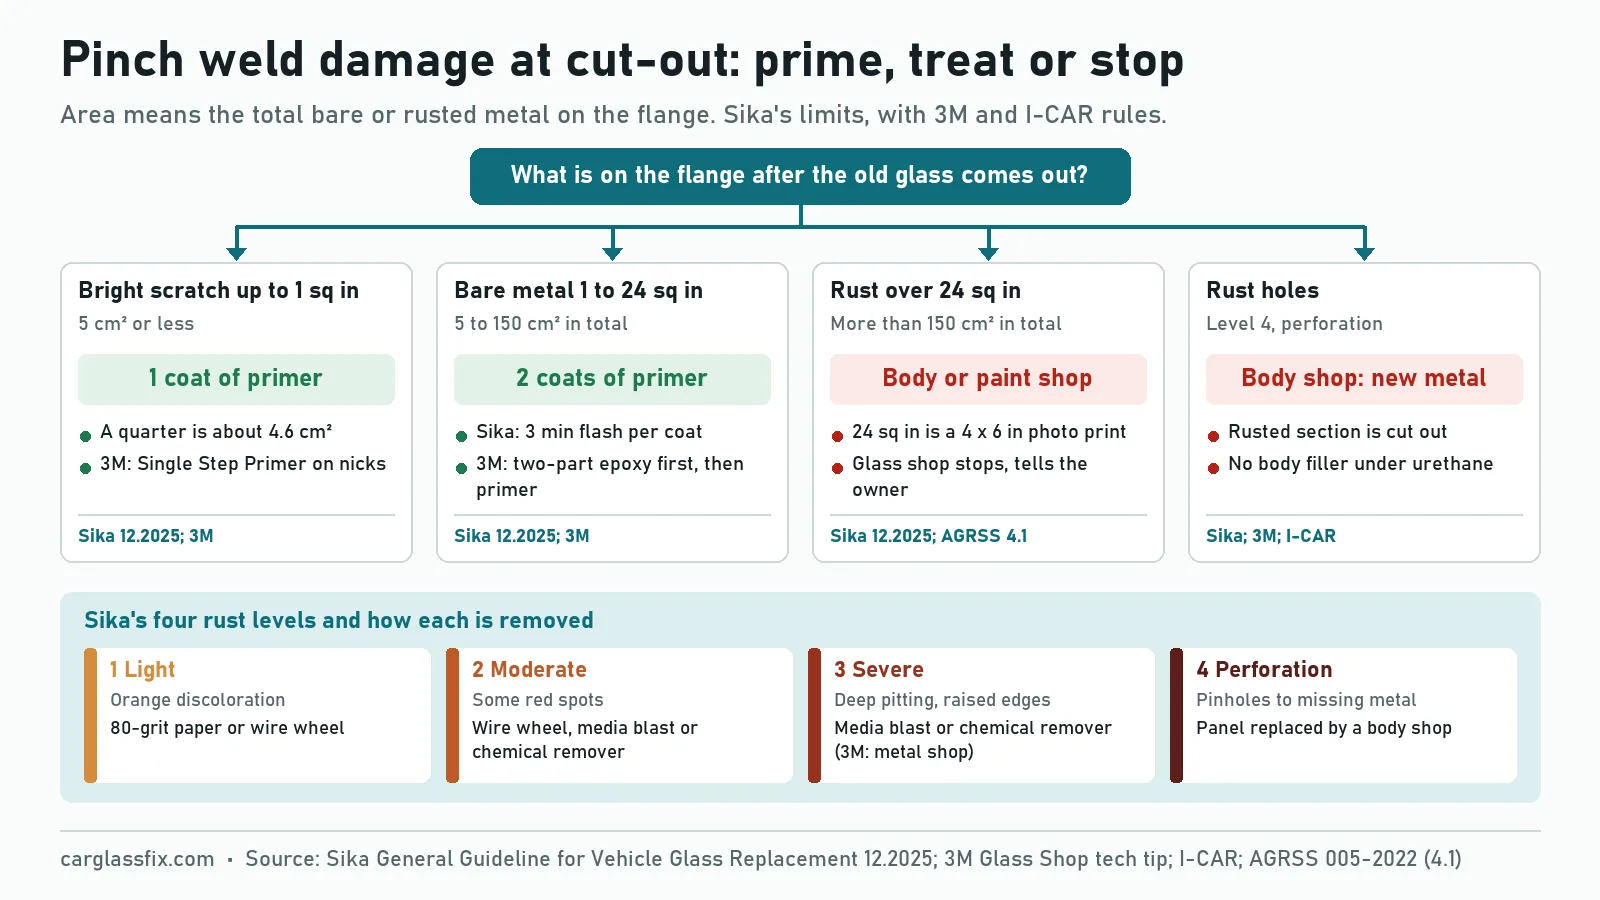
Sika’s guideline sorts pinch weld rust into four levels and measures the total area.
| Level | What it looks like | Removal method (Sika) | Who does the work |
|---|---|---|---|
| 1, light | Light metal discoloration, typically orange | 80-grit sandpaper or a wire wheel | Trained installer, if the total stays under 24 sq in |
| 2, moderate | Some red spots | Wire wheel, media blast or chemical rust remover | Trained installer, if the total stays under 24 sq in |
| 3, severe | Deep pitting, dark red spots, raised edges | Media blast or chemical rust remover | Sika: trained installer under 24 sq in. 3M: metal shop |
| 4, perforation | Pinholes up to missing metal | Rusted section replaced | Body shop |
Sika sends two cases to a body shop: any perforation, and rust over 150 cm² (24 sq in) in total. 3M draws the line earlier and sends severe rust, pitting or perforation to a metal shop. Sika bans body filler where the urethane bonds, and I-CAR calls filler under a windshield a weak link. I-CAR names an improperly installed windshield and age as causes of pinch weld rust. CarParts.com says it often first shows as a thin orange line under the trim, the part covered in how to fix loose windshield molding.
How a rusted pinch weld is repaired before the new glass goes in
A rusted pinch weld is repaired with the glass out, the metal cleaned to bright steel and the bond area left in primer only. The sequence below combines I-CAR’s repair article with Sika, 3M, PPG and GM instructions. The automaker’s procedure for the vehicle comes first.
How a rusted windshield pinch weld is repaired
Assess and tell the owner
The technician records the rust and any other damage before work starts. AGRSS section 4.1 requires written notice when the condition stops the installation.
Remove the glass without new damage
I-CAR says to keep the blade close to the glass so most of the old adhesive stays on the flange. The opening is masked so grinding dust stays out of the defroster vents.
Remove all corrosion
Sika lists 80-grit paper or a wire wheel for light rust, and media blasting or a phosphoric-acid remover for severe rust. I-CAR warns against thinning the metal.
Replace rusted-through metal
Sika requires the whole perforated section to be replaced. No body filler goes where the urethane will bond.
Seal the bare steel
PPG specifies a two-component epoxy primer on bare metal. 3M lets the epoxy cure fully and scuffs it before the next layer.
Keep paint off the bond area
GM masks the flange bonding area before the color coat so the surface stays primer only. Sika waits at least 24 hours when the paint’s drying time is unknown.
Apply the urethane maker’s primer
I-CAR applies a pinch-weld primer made for the urethane over the corrosion-resistant primer. It keeps that primer off the old urethane.
Trim, bead and set the glass
The installer makes the full cut, lays a new bead and sets the glass within the adhesive maker’s time limit. Carlex then runs a leak test.
The makers do not agree on every layer. PPG says the epoxy should be the only coating between bare metal and urethane. 3M and I-CAR add a urethane primer over the cured epoxy. AGRSS section 6.1 tells each shop to follow the adhesive system it installs. Cure times can delay the glass, and Sika’s fallback for unknown paint is a 24-hour wait. Once the glass is in, the urethane’s drive-away time still applies. That waiting period is covered in how to care for your car after glass replacement.
What to check or ask after a windshield replacement
Ask the shop what it found on the pinch weld and how it treated it, and keep the answer in writing. Sika’s guideline tells installers to record every condition they find and to notify the owner. AGRSS section 6.11 requires a shop to report inappropriate materials from an earlier job, such as silicone. Section 8.7 requires records to be kept for at least three years. Items worth having on the invoice:
- Rust or scratches found, and where.
- The bare-metal primer and the number of coats.
- Full cut or complete adhesive removal.
- Urethane and primer lot numbers, traceable under AGRSS section 6.7.
- The minimum drive-away time, which AGRSS section 6.4 requires the shop to state.
I-CAR names water inside the cabin and excessive wind noise as signs of pinch weld rust. Ford’s 2026 Explorer recall for gaps in the factory urethane listed the same two symptoms. More warning signs are in signs of a poor car glass replacement job. AGRSS section 6.13 bans silicone and butyl for leaks at a urethane-set windshield. The repair options are in how to seal a windshield leak.
Frequently asked questions
Can a rusted windshield pinch weld be repaired?
Yes. Sika’s guideline lets a trained installer remove and prime light to severe rust while the glass is out, if the total stays under 24 square inches. Rusted-through metal must be cut out and replaced by a body shop, and body filler cannot go under the urethane.
How much does pinch weld repair cost?
No standard price is published. Priming small scratches is a normal step in the adhesive makers’ procedures, while body shop rust repair is quoted separately. Ask for a written estimate, and ask your insurer what a glass claim pays before work starts; see does insurance cover windshield replacement.
Can the new windshield go in the same day as the rust repair?
Only after the primers and any paint have cured. 3M lets the epoxy primer cure fully before the next step, and Sika waits at least 24 hours when the paint’s drying time is unknown.
Can silicone fix a leak at the pinch weld?
No. AGRSS 005-2022 section 6.13 allows only compatible polyurethane for leaks in a urethane-set windshield. Sika also says its urethanes do not stick to butyl or silicone, so those must be removed completely before the next installation.
What primer goes on a windshield pinch weld?
The primer from the same adhesive system as the urethane, such as Sika Primer-207 AGR, BETAPRIME 5504G or 3M Single Step Primer. GM says not to intermix primers and adhesives. Under 3M and PPG guidance, larger bare areas get a two-part epoxy primer first.
Sources
- ANSI/AGSC/AGRSS 005-2022, Automotive Glass Replacement Safety Standard, sections 3.11, 3.19, 4.1, 6.1, 6.4, 6.7, 6.11, 6.13, 6.14 and 8.7 (checked 24 October 2026)
- 49 CFR 571.212, FMVSS 212 Windshield mounting (checked 24 October 2026)
- Sika: General Guideline for Vehicle Glass Replacement (12.2025) and Clear Aktivator Process installation guideline (01.2026)
- DuPont BETASEAL primerless-to-glass adhesives, installation instructions (2019) and Dow BETASEAL Advanced-Cure adhesives
- 3M SOP: Windshield Removal and Installation (rev. 7/19) and 3M Glass Shop technical tip: preventing corrosion in pinch welds
- PPG Refinish: the proper way to repair a pinchweld area
- I-CAR: Windshield pinchweld corrosion repair and I-CAR: Stationary glass pinchweld preparation, new panel
- I-CAR: GM Glass Replacement Requirements (updated July 2026)
- Ford On Target 2019 fixed glass warnings (Repairer Driven News) and Carlex: Ford/Lincoln Carlite installation guidelines
- NHTSA recall 26V024, Ford Explorer windshield urethane and NHTSA recall 22V158, Kia Cadenza windshield primer
- CarParts.com: How to repair a rusted windshield (June 2026)
- US Mint coin specifications

Similar Posts